This notebook is an exercise in the Intro to Deep Learning course. You can reference the tutorial at this link.
Introduction
介绍
In the tutorial, we saw how to build deep neural networks by stacking layers inside a Sequential model. By adding an activation function after the hidden layers, we gave the network the ability to learn more complex (non-linear) relationships in the data.
在本教程中,我们了解了如何通过在模型内有顺序的堆叠层来构建深度神经网络。 通过在隐藏层之后添加激活函数,我们使网络能够学习数据中更复杂(非线性)的关系。
In these exercises, you'll build a neural network with several hidden layers and then explore some activation functions beyond ReLU. Run this next cell to set everything up!
在这些练习中,您将构建一个具有多个隐藏层的神经网络,然后探索 ReLU 之外的一些激活函数。 运行下一个单元格来设置一切!
import tensorflow as tf

# Setup plotting
import matplotlib.pyplot as plt

plt.style.use('seaborn-v0_8-whitegrid')
# Set Matplotlib defaults
plt.rc('figure', autolayout=True)
plt.rc('axes', labelweight='bold', labelsize='large',
       titleweight='bold', titlesize=18, titlepad=10)

# Setup feedback system
from learntools.core import binder
binder.bind(globals())
from learntools.deep_learning_intro.ex2 import *
2024-04-15 08:34:27.446430: E external/local_xla/xla/stream_executor/cuda/cuda_dnn.cc:9261] Unable to register cuDNN factory: Attempting to register factory for plugin cuDNN when one has already been registered
2024-04-15 08:34:27.446514: E external/local_xla/xla/stream_executor/cuda/cuda_fft.cc:607] Unable to register cuFFT factory: Attempting to register factory for plugin cuFFT when one has already been registered
2024-04-15 08:34:27.448090: E external/local_xla/xla/stream_executor/cuda/cuda_blas.cc:1515] Unable to register cuBLAS factory: Attempting to register factory for plugin cuBLAS when one has already been registeredIn the Concrete dataset, your task is to predict the compressive strength of concrete manufactured according to various recipes.
在混凝土数据集中,您的任务是预测根据各种配方制造的混凝土的抗压强度。
Run the next code cell without changes to load the dataset.
运行下一个代码单元而不进行任何更改以加载数据集。
import pandas as pd

concrete = pd.read_csv('../input/dl-course-data/concrete.csv')
concrete.head()| Cement | BlastFurnaceSlag | FlyAsh | Water | Superplasticizer | CoarseAggregate | FineAggregate | Age | CompressiveStrength | |
|---|---|---|---|---|---|---|---|---|---|
| 0 | 540.0 | 0.0 | 0.0 | 162.0 | 2.5 | 1040.0 | 676.0 | 28 | 79.99 |
| 1 | 540.0 | 0.0 | 0.0 | 162.0 | 2.5 | 1055.0 | 676.0 | 28 | 61.89 |
| 2 | 332.5 | 142.5 | 0.0 | 228.0 | 0.0 | 932.0 | 594.0 | 270 | 40.27 |
| 3 | 332.5 | 142.5 | 0.0 | 228.0 | 0.0 | 932.0 | 594.0 | 365 | 41.05 |
| 4 | 198.6 | 132.4 | 0.0 | 192.0 | 0.0 | 978.4 | 825.5 | 360 | 44.30 |
1) Input Shape
1) 输入形状
The target for this task is the column 'CompressiveStrength'. The remaining columns are the features we'll use as inputs.
此任务的目标是抗压强度列。 其余列是我们将用作输入的特征。
What would be the input shape for this dataset?
该数据集的输入形状是什么?
# YOUR CODE HERE
# input_shape = ____
input_shape = (8,)

# Check your answer
q_1.check()
Correct
# Lines below will give you a hint or solution code
#q_1.hint()
q_1.solution()
Solution:
input_shape = [8]
# you could also use a 1-tuple, like input_shape = (8,)
2) Define a Model with Hidden Layers
2) 定义具有隐藏层的模型
Now create a model with three hidden layers, each having 512 units and the ReLU activation. Be sure to include an output layer of one unit and no activation, and also input_shape as an argument to the first layer.
现在创建一个具有三个隐藏层的模型,每个隐藏层有 512 个单元和 ReLU 激活函数。 确保包含一个单元且无激活的输出层,以及input_shape作为第一层的参数。
from tensorflow import keras
from tensorflow.keras import layers
# YOUR CODE HERE
# model = ____
model = keras.Sequential([
layers.Dense(units=512, activation='relu', input_shape=input_shape),
layers.Dense(units=512, activation='relu'),
layers.Dense(units=512, activation='relu'),
layers.Dense(units=1)
])
# Check your answer
q_2.check()Correct
# Lines below will give you a hint or solution code
#q_2.hint()
q_2.solution()
Solution:
from tensorflow import keras
from tensorflow.keras import layers

model = keras.Sequential([
    layers.Dense(512, activation='relu', input_shape=input_shape),
    layers.Dense(512, activation='relu'),
    layers.Dense(512, activation='relu'),
    layers.Dense(1),
])
3) Activation Layers
3) 激活层
Let's explore activations functions some.
让我们探索一下激活函数。
The usual way of attaching an activation function to a Dense layer is to include it as part of the definition with the activation argument. Sometimes though you'll want to put some other layer between the Dense layer and its activation function. (We'll see an example of this in Lesson 5 with batch normalization.) In this case, we can define the activation in its own Activation layer, like so:
将激活函数附加到Dense层的常用方法是将其作为带有activation参数的定义的一部分。 有时你会想在Dense层及其激活函数之间放置一些其他层。 (我们将在第 5 课中看到批量归一化的示例。)在这种情况下,我们可以在其自己的Activation层中定义激活,如下所示:
layers.Dense(units=8),
layers.Activation('relu')
This is completely equivalent to the ordinary way: layers.Dense(units=8, activation='relu').
这完全等价于普通的方式:layers.Dense(units=8,activation='relu')。
Rewrite the following model so that each activation is in its own Activation layer.
重写以下模型,使每个激活都位于自己的Activation层中。
### YOUR CODE HERE: rewrite this to use activation layers
# model = keras.Sequential([
#     layers.Dense(32, activation='relu', input_shape=[8]),
#     layers.Dense(32, activation='relu'),
#     layers.Dense(1),
# ])

model = keras.Sequential([
    layers.Dense(32, input_shape=[8]),
    layers.Activation('relu'),
    layers.Dense(32,),
    layers.Activation('relu'),
    layers.Dense(1),
])

# Check your answer
q_3.check()
Correct
# Lines below will give you a hint or solution code
#q_3.hint()
q_3.solution()
Solution:
model = keras.Sequential([
    layers.Dense(32, input_shape=[8]),
    layers.Activation('relu'),
    layers.Dense(32),
    layers.Activation('relu'),
    layers.Dense(1),
])
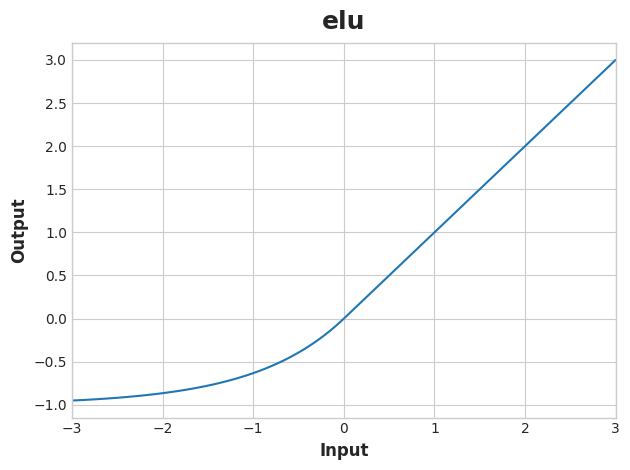
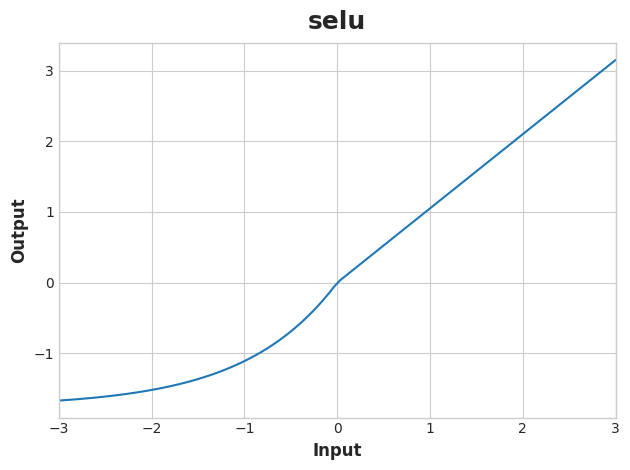
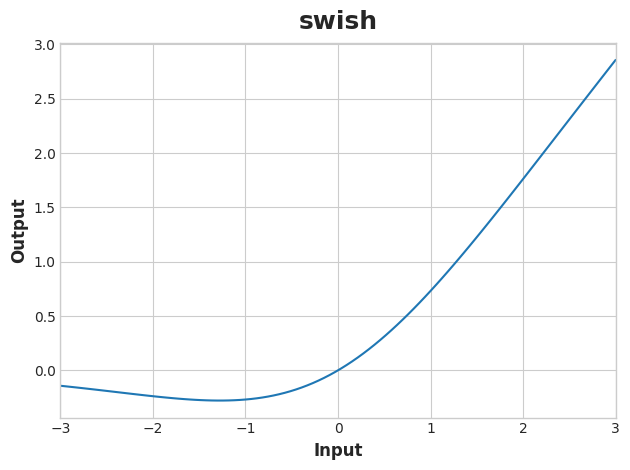
Optional: Alternatives to ReLU
There is a whole family of variants of the 'relu' activation -- 'elu', 'selu', and 'swish', among others -- all of which you can use in Keras. Sometimes one activation will perform better than another on a given task, so you could consider experimenting with activations as you develop a model. The ReLU activation tends to do well on most problems, so it's a good one to start with.
Let's look at the graphs of some of these. Change the activation from 'relu' to one of the others named above. Then run the cell to see the graph. (Check out the documentation for more ideas.)
# YOUR CODE HERE: Change 'relu' to 'elu', 'selu', 'swish'... or something else
act_funs = ['relu', 'elu', 'selu', 'swish']
for act_fun in act_funs:
    activation_layer = layers.Activation(act_fun)

    x = tf.linspace(-3.0, 3.0, 100)
    y = activation_layer(x) # once created, a layer is callable just like a function

    plt.figure(dpi=100)
    plt.plot(x, y)
    plt.xlim(-3, 3)
    plt.xlabel("Input")
    plt.ylabel("Output")
    plt.title(act_fun)
#     plt.show()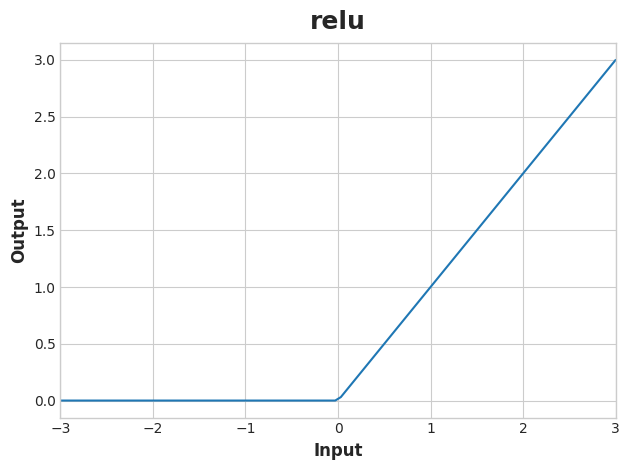
from math import ceil
act_funs = ['relu', 'elu', 'selu', 'swish']
fig, axes = plt.subplots(2,2)
for index, act_fun in enumerate(act_funs):

    activation_layer = layers.Activation(act_fun)
    x = tf.linspace(-3.0, 3.0, 100)
    y = activation_layer(x)
    axes[index//2,index%2].plot(x,y)
    axes[index//2,index%2].set_xlim(-3, 3)
    axes[index//2,index%2].set_title(act_fun)
plt.show()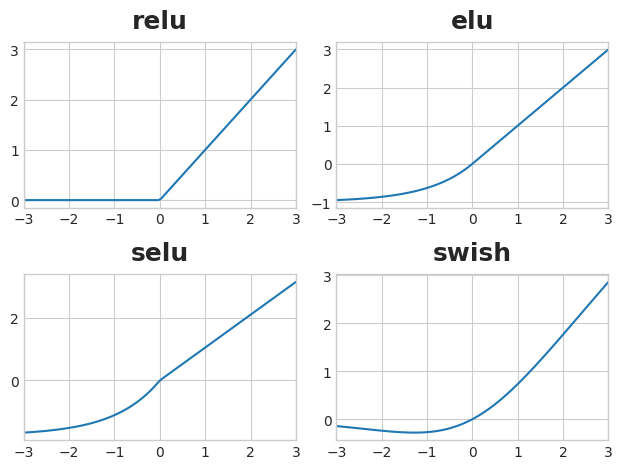
Keep Going
继续前进
Now move on to Lesson 3 and learn how to train neural networks with stochastic gradient descent.
现在继续学习第 3 课,学习如何使用随机梯度下降训练神经网络。