This notebook is an exercise in the Computer Vision course. You can reference the tutorial at this link.
Accelerate Training with a Kaggle GPU!
Did you know Kaggle offers free time with a GPU accelerator? You can speed up training neural networks in this course by switching to GPU in the
Acceleratoroption on the right. (It may already be turned on.) Two things to be aware of:Changing the
Acceleratoroption will cause the notebook session to restart. You'll need to rerun any setup code.You can have only one GPU session at a time, so be sure to shut the notebook down after you've finished the exercise.
使用 Kaggle GPU 加速训练!
您知道 Kaggle 提供 GPU 加速器的免费时长吗? 您可以通过在右侧的
加速器选项中切换到 GPU 来加快本课程中神经网络的训练速度。 (它可能已经打开。)需要注意的两件事:更改
加速器选项将导致笔记本会话重新启动。 您需要重新运行所有设置代码。您一次只能有一个 GPU 会话,因此请务必在完成练习后关闭笔记本。
Introduction
介绍
In the tutorial, we saw how to build an image classifier by attaching a head of dense layers to a pretrained base. The base we used was from a model called VGG16. We saw that the VGG16 architecture was prone to overfitting this dataset. Over this course, you'll learn a number of ways you can improve upon this initial attempt.
在本教程中,我们了解了如何通过将密集层的头部附加到预训练的基础来构建图像分类器。 我们使用的底座来自名为 VGG16 的模型。 我们发现 VGG16 架构很容易过度拟合该数据集。 在本课程中,您将学习多种可以在最初尝试的基础上进行改进的方法。
The first way you'll see is to use a base more appropriate to the dataset. The base this model comes from is called InceptionV1 (also known as GoogLeNet). InceptionV1 was one of the early winners of the ImageNet competition. One of its successors, InceptionV4, is among the state of the art today.
您将看到的第一种方法是使用更适合数据集的基础。 该模型的基础称为 InceptionV1(也称为 GoogLeNet)。 InceptionV1 是 ImageNet 竞赛的早期获胜者之一。 它的后继者之一 InceptionV4 属于当今最先进的技术之一。
To get started, run the code cell below to set everything up.
首先,运行下面的代码单元来设置所有内容。
# Setup feedback system
from learntools.core import binder
binder.bind(globals())
from learntools.computer_vision.ex1 import *

# Imports
import os, warnings
import matplotlib.pyplot as plt
from matplotlib import gridspec

import numpy as np
import tensorflow as tf
from tensorflow.keras.preprocessing import image_dataset_from_directory

# Reproducability
def set_seed(seed=55555):
    np.random.seed(seed)
    tf.random.set_seed(seed)
    os.environ['PYTHONHASHSEED'] = str(seed)
    os.environ['TF_DETERMINISTIC_OPS'] = '1'
set_seed()

# Set Matplotlib defaults
plt.rc('figure', autolayout=True)
plt.rc('axes', labelweight='bold', labelsize='large',
       titleweight='bold', titlesize=18, titlepad=10)
plt.rc('image', cmap='magma')
warnings.filterwarnings("ignore") # to clean up output cells

# Load training and validation sets
ds_train_ = image_dataset_from_directory(
    '../input/car-or-truck/train',
    labels='inferred',
    label_mode='binary',
    image_size=[128, 128],
    interpolation='nearest',
    batch_size=64,
    shuffle=True,
)
ds_valid_ = image_dataset_from_directory(
    '../input/car-or-truck/valid',
    labels='inferred',
    label_mode='binary',
    image_size=[128, 128],
    interpolation='nearest',
    batch_size=64,
    shuffle=False,
)

# Data Pipeline
def convert_to_float(image, label):
    image = tf.image.convert_image_dtype(image, dtype=tf.float32)
    return image, label

AUTOTUNE = tf.data.experimental.AUTOTUNE
ds_train = (
    ds_train_
    .map(convert_to_float)
    .cache()
    .prefetch(buffer_size=AUTOTUNE)
)
ds_valid = (
    ds_valid_
    .map(convert_to_float)
    .cache()
    .prefetch(buffer_size=AUTOTUNE)
)
2024-05-28 14:54:55.683002: E external/local_xla/xla/stream_executor/cuda/cuda_dnn.cc:9261] Unable to register cuDNN factory: Attempting to register factory for plugin cuDNN when one has already been registered
2024-05-28 14:54:55.683055: E external/local_xla/xla/stream_executor/cuda/cuda_fft.cc:607] Unable to register cuFFT factory: Attempting to register factory for plugin cuFFT when one has already been registered
2024-05-28 14:54:55.684583: E external/local_xla/xla/stream_executor/cuda/cuda_blas.cc:1515] Unable to register cuBLAS factory: Attempting to register factory for plugin cuBLAS when one has already been registered

Found 5117 files belonging to 2 classes.
Found 5051 files belonging to 2 classes.
The InceptionV1 model pretrained on ImageNet is available in the TensorFlow Hub repository, but we'll load it from a local copy. Run this cell to load InceptionV1 for your base.
在 ImageNet 上预训练的 InceptionV1 模型可在 TensorFlow Hub 存储库中找到,但我们将从本地副本加载它。 运行此单元来为您的基础加载 InceptionV1。
import tensorflow_hub as hub

pretrained_base = tf.keras.models.load_model(
    '../input/cv-course-models/cv-course-models/inceptionv1'
)
1) Define Pretrained Base
1) 定义预训练基础
Now that you have a pretrained base to do our feature extraction, decide whether this base should be trainable or not.
现在您已经有了一个预训练的基础来进行特征提取,请决定该基础是否应该可训练。
# YOUR_CODE_HERE
# pretrained_base.trainable = ____
pretrained_base.trainable = False

# Check your answer
q_1.check()
Correct: When doing transfer learning, it's generally not a good idea to retrain the entire base -- at least not without some care. The reason is that the random weights in the head will initially create large gradient updates, which propogate back into the base layers and destroy much of the pretraining. Using techniques known as fine tuning it's possible to further train the base on new data, but this requires some care to do well.
在进行迁移学习时,重新训练整个基础通常不是一个好主意——至少在不小心的情况下是这样。 原因是头部中的随机权重最初会产生较大的梯度更新,这些更新会传播回基础层并破坏大部分预训练。 使用称为微调的技术可以进一步训练新数据的基础,但这需要一些小心才能做好。
# Lines below will give you a hint or solution code
#q_1.hint()
q_1.solution()
Solution:
pretrained_base.trainable = False2) Attach Head
2)附加头部
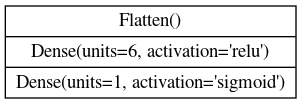
Now that the base is defined to do the feature extraction, create a head of Dense layers to perform the classification, following this diagram:
现在定义了基础来进行特征提取,创建一个密集层的头部来执行分类,如下图所示:
from tensorflow import keras
from tensorflow.keras import layers

model = keras.Sequential([
    pretrained_base,
    layers.Flatten(),
    # YOUR CODE HERE. Attach a head of dense layers.
    # ____
#     layers.Dropout(rate=0.3),
    layers.Dense(units=6, activation="relu"),
#     layers.Dropout(rate=0.3),
    layers.Dense(units=1, activation="sigmoid")
])

# Check your answer
q_2.check()
Correct
# Lines below will give you a hint or solution code
#q_2.hint()
q_2.solution()
Solution:
from tensorflow import keras
from tensorflow.keras import layers

model = keras.Sequential([
    pretrained_base,
    layers.Flatten(),
    layers.Dense(6, activation='relu'),
    layers.Dense(1, activation='sigmoid'),
])
3) Train
3) 训练
Before training a model in Keras, you need to specify an optimizer to perform the gradient descent, a loss function to be minimized, and (optionally) any performance metrics. The optimization algorithm we'll use for this course is called "Adam", which generally performs well regardless of what kind of problem you're trying to solve.
在 Keras 中训练模型之前,您需要指定一个优化器来执行梯度下降、要最小化的损失函数以及(可选)任何性能指标。 我们将在本课程中使用的优化算法称为 Adam,无论您要解决什么类型的问题,它通常都表现良好。
The loss and the metrics, however, need to match the kind of problem you're trying to solve. Our problem is a binary classification problem: Car coded as 0, and Truck coded as 1. Choose an appropriate loss and an appropriate accuracy metric for binary classification.
然而,损失和指标需要与您要解决的问题类型相匹配。 我们的问题是一个二元分类问题:Car编码为 0,Truck编码为 1。为二元分类选择适当的损失和适当的准确度指标。
# YOUR CODE HERE: what loss function should you use for a binary
# classification problem? (Your answer for each should be a string.)
optimizer = tf.keras.optimizers.Adam(epsilon=0.01)
model.compile(
    optimizer=optimizer,
#     loss = ____,
#     metrics=[____],
    loss="binary_crossentropy",
    metrics=["binary_accuracy"],

)

# Check your answer
q_3.check()
Correct
# Lines below will give you a hint or solution code
#q_3.hint()
q_3.solution()
Solution:
model.compile(
    optimizer='adam',
    loss='binary_crossentropy',
    metrics=['binary_accuracy'],
)
history = model.fit(
    ds_train,
    validation_data=ds_valid,
    epochs=30,
    verbose=False,
)
WARNING: All log messages before absl::InitializeLog() is called are written to STDERR
I0000 00:00:1716908114.219866 2241 device_compiler.h:186] Compiled cluster using XLA! This line is logged at most once for the lifetime of the process.Run the cell below to plot the loss and metric curves for this training run.
import pandas as pd
history_frame = pd.DataFrame(history.history)
history_frame.loc[:, ['loss', 'val_loss']].plot()
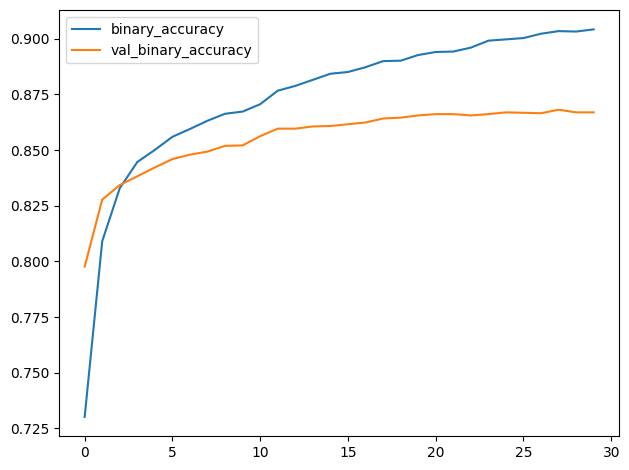
history_frame.loc[:, ['binary_accuracy', 'val_binary_accuracy']].plot();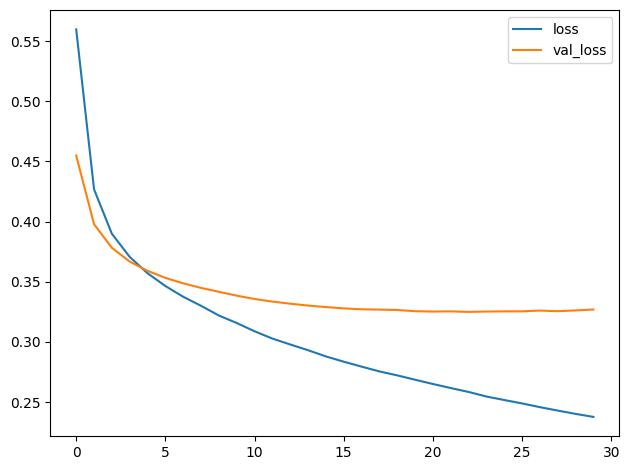
4) Examine Loss and Accuracy
4) 检查损失和准确性
Do you notice a difference between these learning curves and the curves for VGG16 from the tutorial? What does this difference tell you about what this model (InceptionV2) learned compared to VGG16? Are there ways in which one is better than the other? Worse?
您是否注意到这些学习曲线与教程中的 VGG16 曲线之间存在差异? 与 VGG16 相比,这种差异告诉您该模型 (InceptionV2) 学到了什么? 有哪些方面比另一种更好? 更差?
After you've thought about it, run the cell below to see the answer.
想清楚之后,运行下面的单元格即可查看答案。
# View the solution (Run this code cell to receive credit!)
q_4.check()
Correct:
That the training loss and validation loss stay fairly close is evidence that the model isn't just memorizing the training data, but rather learning general properties of the two classes. But, because this model converges at a loss greater than the VGG16 model, it's likely that it is underfitting some, and could benefit from some extra capacity.
训练损失和验证损失保持相当接近,这证明该模型不仅仅是记住训练数据,而是学习两个类别的一般属性。 但是,由于该模型的收敛损失大于 VGG16 模型,因此它可能欠拟合一些,并且可以从一些额外的容量中受益。
Conclusion
结论
In this first lesson, you learned the basics of convolutional image classifiers, that they consist of a base for extracting features from images, and a head which uses the features to decide the image's class. You also saw how to build a classifier with transfer learning on pretrained base.
在第一课中,您学习了 卷积图像分类器 的基础知识,它们由用于从图像中提取特征的 基础 和使用特征来决定图像类别的 头 组成。 您还了解了如何在预训练的基础上使用迁移学习构建分类器。
Keep Going
继续前进
Move on to Lesson 2 for a detailed look at how the base does this feature extraction. (It's really cool!)
继续阅读第 2 课,详细了解基础如何进行特征提取。 (这个真的很酷!)