import numpy as np
from itertools import product
from skimage import draw, transform

def circle(size, val=None, r_shrink=0):
    circle = np.zeros([size[0]+1, size[1]+1])
    rr, cc = draw.circle_perimeter(
        size[0]//2, size[1]//2,
        radius=size[0]//2 - r_shrink,
        shape=[size[0]+1, size[1]+1],
    )
    if val is None:
        circle[rr, cc] = np.random.uniform(size=circle.shape)[rr, cc]
    else:
        circle[rr, cc] = val
    circle = transform.resize(circle, size, order=0)
    return circle

def show_kernel(kernel, label=True, digits=None, text_size=28):
    # Format kernel
    kernel = np.array(kernel)
    if digits is not None:
        kernel = kernel.round(digits)

    # Plot kernel
    cmap = plt.get_cmap('Blues_r')
    plt.imshow(kernel, cmap=cmap)
    rows, cols = kernel.shape
    thresh = (kernel.max()+kernel.min())/2
    # Optionally, add value labels
    if label:
        for i, j in product(range(rows), range(cols)):
            val = kernel[i, j]
            color = cmap(0) if val > thresh else cmap(255)
            plt.text(j, i, val,
                     color=color, size=text_size,
                     horizontalalignment='center', verticalalignment='center')
    plt.xticks([])
    plt.yticks([])

def show_extraction(image,
                    kernel,
                    conv_stride=1,
                    conv_padding='valid',
                    activation='relu',
                    pool_size=2,
                    pool_stride=2,
                    pool_padding='same',
                    figsize=(10, 10),
                    subplot_shape=(2, 2),
                    ops=['Input', 'Filter', 'Detect', 'Condense'],
                    gamma=1.0):
    # Create Layers
    model = tf.keras.Sequential([
                    tf.keras.layers.Conv2D(
                        filters=1,
                        kernel_size=kernel.shape,
                        strides=conv_stride,
                        padding=conv_padding,
                        use_bias=False,
                        input_shape=image.shape,
                    ),
                    tf.keras.layers.Activation(activation),
                    tf.keras.layers.MaxPool2D(
                        pool_size=pool_size,
                        strides=pool_stride,
                        padding=pool_padding,
                    ),
                   ])

    layer_filter, layer_detect, layer_condense = model.layers
    kernel = tf.reshape(kernel, [*kernel.shape, 1, 1])
    layer_filter.set_weights([kernel])

    # Format for TF
    image = tf.expand_dims(image, axis=0)
    image = tf.image.convert_image_dtype(image, dtype=tf.float32)

    # Extract Feature
    image_filter = layer_filter(image)
    image_detect = layer_detect(image_filter)
    image_condense = layer_condense(image_detect)

    images = {}
    if 'Input' in ops:
        images.update({'Input': (image, 1.0)})
    if 'Filter' in ops:
        images.update({'Filter': (image_filter, 1.0)})
    if 'Detect' in ops:
        images.update({'Detect': (image_detect, gamma)})
    if 'Condense' in ops:
        images.update({'Condense': (image_condense, gamma)})

    # Plot
    plt.figure(figsize=figsize)
    for i, title in enumerate(ops):
        image, gamma = images[title]
        plt.subplot(*subplot_shape, i+1)
        plt.imshow(tf.image.adjust_gamma(tf.squeeze(image), gamma))
        plt.axis('off')
        plt.title(title)
Introduction
介绍
In the previous two lessons, we learned about the three operations that carry out feature extraction from an image:
在前两节课中,我们学习了从图像中提取特征的三种操作:
- filter with a convolution layer
- 使用 卷积 层进行 过滤
- detect with ReLU activation
- 使用 ReLU 激活进行 检测
- condense with a maximum pooling layer
- 使用 最大池化 层进行 压缩
The convolution and pooling operations share a common feature: they are both performed over a sliding window. With convolution, this "window" is given by the dimensions of the kernel, the parameter kernel_size. With pooling, it is the pooling window, given by pool_size.
卷积和池化操作有一个共同的特点:它们都是在 滑动窗口 上执行的。对于卷积,这个“窗口”由内核的尺寸(参数 kernel_size)给出。对于池化,它是池化窗口,由 pool_size 给出。
There are two additional parameters affecting both convolution and pooling layers -- these are the strides of the window and whether to use padding at the image edges. The strides parameter says how far the window should move at each step, and the padding parameter describes how we handle the pixels at the edges of the input.
还有两个附加参数会影响卷积层和池化层——它们是窗口的步幅以及是否在图像边缘使用填充。 步幅参数表示窗口在每个步骤中应移动多远,填充参数描述我们如何处理输入边缘的像素。
With these two parameters, defining the two layers becomes:
有了这两个参数,定义这两个层就变成了:
from tensorflow import keras
from tensorflow.keras import layers

model = keras.Sequential([
    layers.Conv2D(filters=64,
                  kernel_size=3,
                  strides=1,
                  padding='same',
                  activation='relu'),
    layers.MaxPool2D(pool_size=2,
                     strides=1,
                     padding='same')
    # More layers follow
])
2024-08-26 14:48:37.470320: E external/local_xla/xla/stream_executor/cuda/cuda_dnn.cc:9261] Unable to register cuDNN factory: Attempting to register factory for plugin cuDNN when one has already been registered
2024-08-26 14:48:37.470386: E external/local_xla/xla/stream_executor/cuda/cuda_fft.cc:607] Unable to register cuFFT factory: Attempting to register factory for plugin cuFFT when one has already been registered
2024-08-26 14:48:37.472253: E external/local_xla/xla/stream_executor/cuda/cuda_blas.cc:1515] Unable to register cuBLAS factory: Attempting to register factory for plugin cuBLAS when one has already been registeredStride
步幅
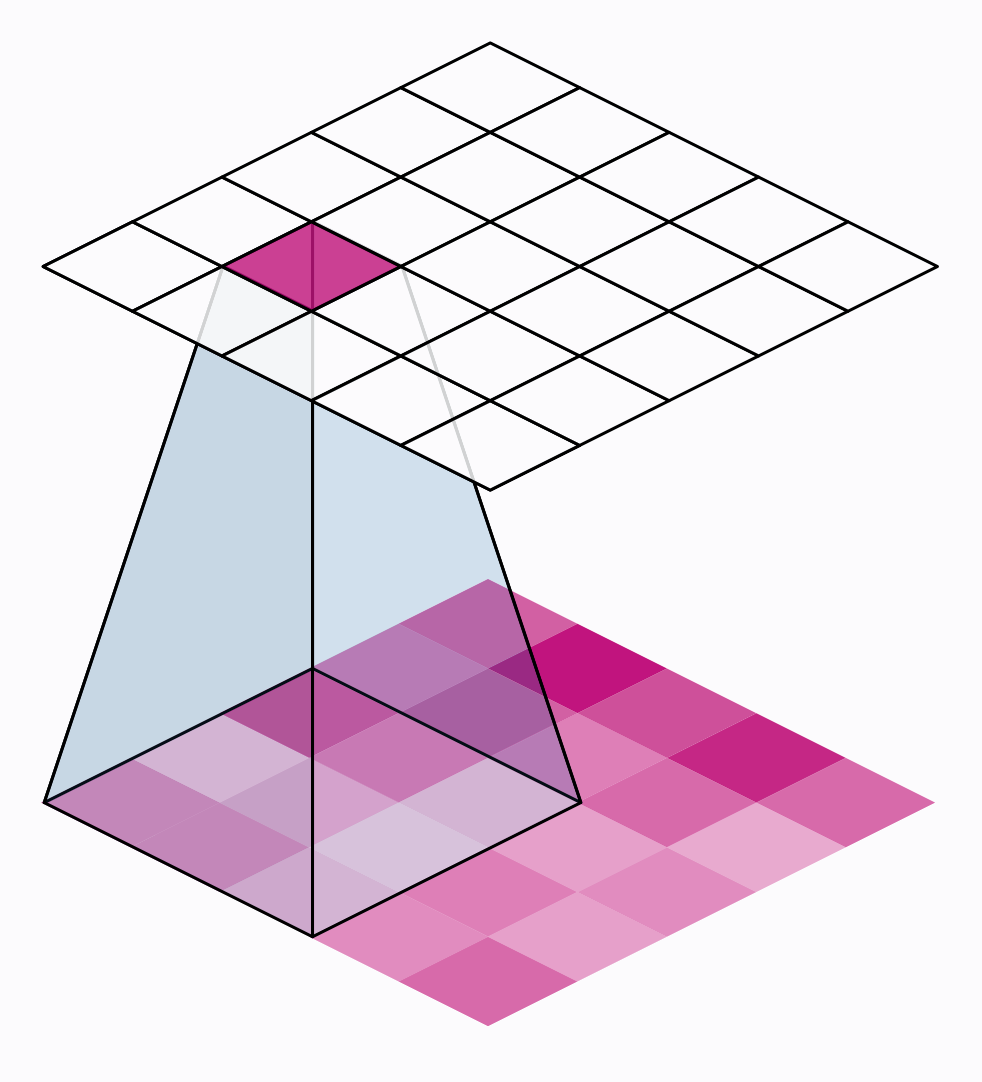
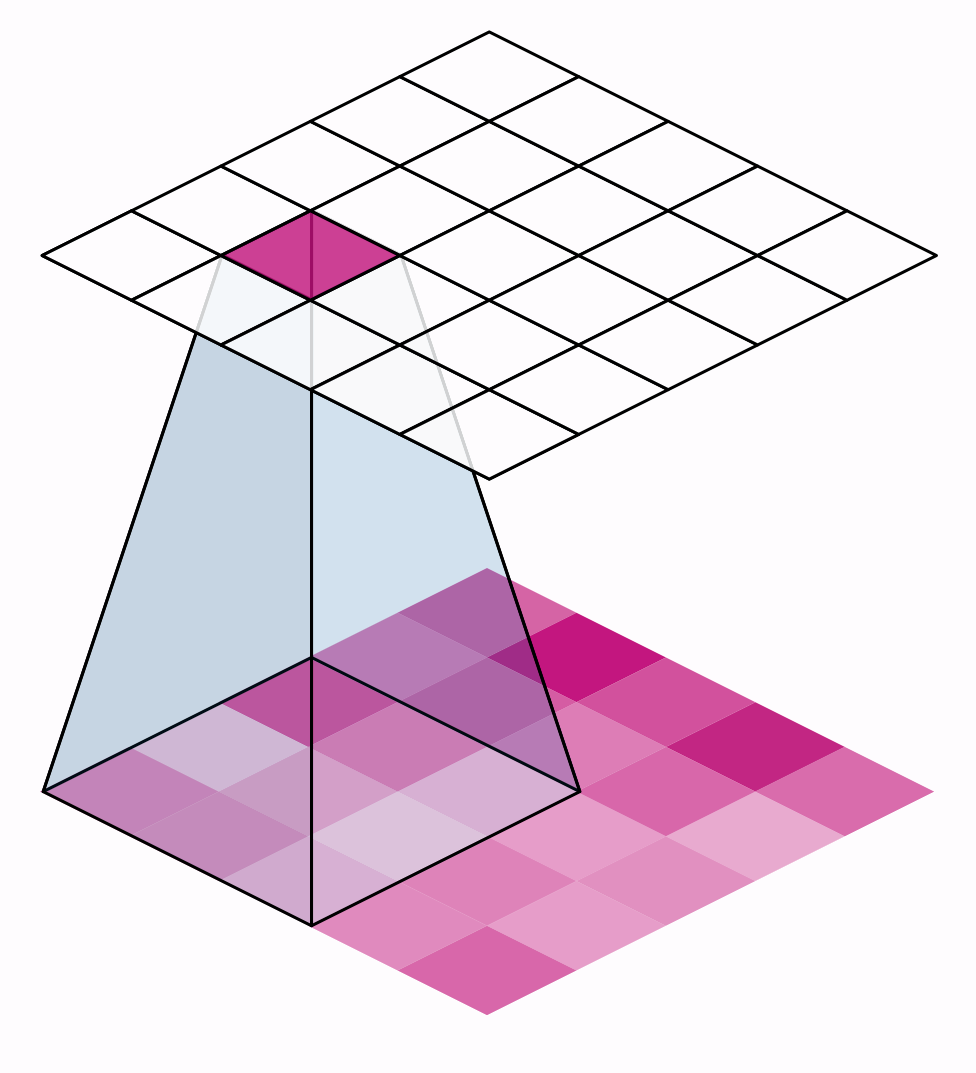
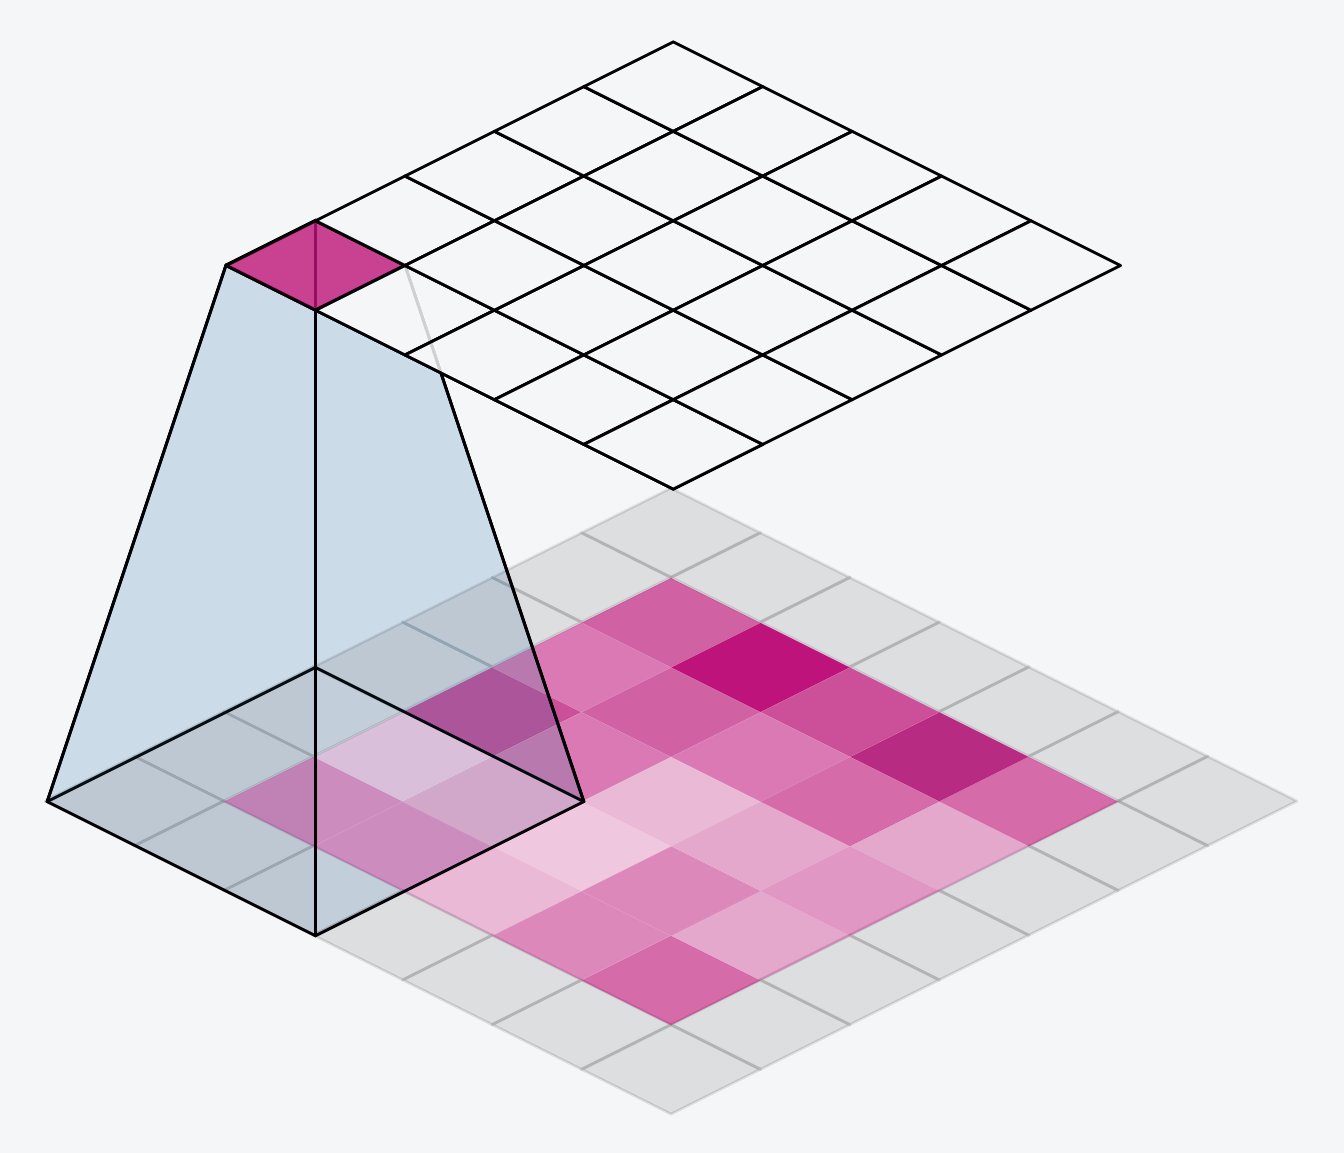
The distance the window moves at each step is called the stride. We need to specify the stride in both dimensions of the image: one for moving left to right and one for moving top to bottom. This animation shows strides=(2, 2), a movement of 2 pixels each step.
窗口每一步移动的距离称为步幅。我们需要在图像的两个维度上指定步幅:一个用于从左向右移动,一个用于从上向下移动。此动画显示步幅=(2, 2),即每一步移动 2 个像素。
What effect does the stride have? Whenever the stride in either direction is greater than 1, the sliding window will skip over some of the pixels in the input at each step.
步幅有什么影响?只要任一方向的步幅大于 1,滑动窗口就会在每个步骤中跳过输入中的某些像素。
Because we want high-quality features to use for classification, convolutional layers will most often have strides=(1, 1). Increasing the stride means that we miss out on potentially valuble information in our summary. Maximum pooling layers, however, will almost always have stride values greater than 1, like (2, 2) or (3, 3), but not larger than the window itself.
因为我们希望使用高质量的特征进行分类,所以卷积层通常会有 strides=(1, 1)。增加步幅意味着我们会错过摘要中可能有价值的信息。然而,最大池化层的步幅值几乎总是大于 1,如 (2, 2) 或 (3, 3),但不大于窗口本身。
Finally, note that when the value of the strides is the same number in both directions, you only need to set that number; for instance, instead of strides=(2, 2), you could use strides=2 for the parameter setting.
最后,请注意,当 strides 的值在两个方向上都是相同的数字时,您只需设置该数字;例如,您可以使用 strides=2 来设置参数,而不是 strides=(2, 2)。
Padding
填充
When performing the sliding window computation, there is a question as to what to do at the boundaries of the input. Staying entirely inside the input image means the window will never sit squarely over these boundary pixels like it does for every other pixel in the input. Since we aren't treating all the pixels exactly the same, could there be a problem?
执行滑动窗口计算时,存在一个问题,即在输入的边界上该做什么。完全停留在输入图像内意味着窗口永远不会像对待输入中的其他每个像素那样正好位于这些边界像素上方。由于我们不会将所有像素完全相同地处理,因此会不会有问题?
What the convolution does with these boundary values is determined by its padding parameter. In TensorFlow, you have two choices: either padding='same' or padding='valid'. There are trade-offs with each.
卷积对这些边界值的操作由其padding参数决定。在 TensorFlow 中,您有两个选择:padding='same' 或 padding='valid'。每种选择都有权衡。
When we set padding='valid', the convolution window will stay entirely inside the input. The drawback is that the output shrinks (loses pixels), and shrinks more for larger kernels. This will limit the number of layers the network can contain, especially when inputs are small in size.
当我们设置padding='valid'时,卷积窗口将完全停留在输入内。缺点是输出会缩小(丢失像素),并且对于较大的内核,缩小幅度会更大。这将限制网络可以包含的层数,尤其是在输入较小的情况下。
The alternative is to use padding='same'. The trick here is to pad the input with 0's around its borders, using just enough 0's to make the size of the output the same as the size of the input. This can have the effect however of diluting the influence of pixels at the borders. The animation below shows a sliding window with 'same' padding.
另一种方法是使用padding='same'。这里的技巧是在输入的边界周围用 0 填充,使用足够多的 0 使输出的大小与输入的大小相同。然而,这可以起到削弱边界像素影响的效果。下面的动画显示了一个带有相同填充的滑动窗口。
The VGG model we've been looking at uses same padding for all of its convolutional layers. Most modern convnets will use some combination of the two. (Another parameter to tune!)
我们一直在研究的 VGG 模型对其所有卷积层都使用了same的填充。大多数现代卷积网络都会使用两者的某种组合。(另一个需要调整的参数!)
Example - Exploring Sliding Windows
示例 - 探索滑动窗口
To better understand the effect of the sliding window parameters, it can help to observe a feature extraction on a low-resolution image so that we can see the individual pixels. Let's just look at a simple circle.
为了更好地理解滑动窗口参数的效果,观察低分辨率图像上的特征提取会有所帮助,这样我们就可以看到单个像素。让我们看看一个简单的圆圈。
This next hidden cell will create an image and kernel for us.
下一个隐藏单元将为我们创建一个图像和内核。
import tensorflow as tf
import matplotlib.pyplot as plt

plt.rc('figure', autolayout=True)
plt.rc('axes', labelweight='bold', labelsize='large',
       titleweight='bold', titlesize=18, titlepad=10)
plt.rc('image', cmap='magma')

image = circle([64, 64], val=1.0, r_shrink=3)
image = tf.reshape(image, [*image.shape, 1])
# Bottom sobel
kernel = tf.constant(
    [[-1, -2, -1],
     [0, 0, 0],
     [1, 2, 1]],
)

show_kernel(kernel)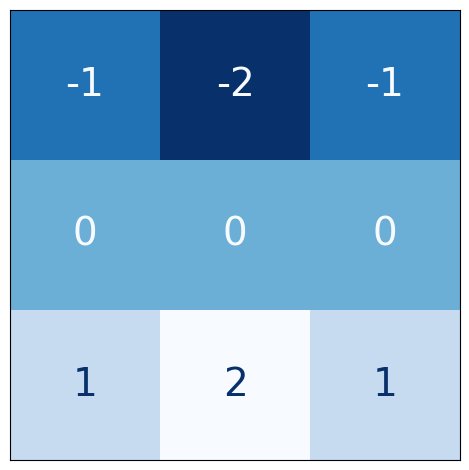
The VGG architecture is fairly simple. It uses convolution with strides of 1 and maximum pooling with $2 \times 2$ windows and strides of 2. We've included a function in the visiontools utility script that will show us all the steps.
VGG 架构相当简单。它使用步幅为 1 的卷积和最大池化,使用 $2 \times 2$ 个窗口和步幅为 2。我们在 visiontools 实用程序脚本中包含了一个函数,它将向我们展示所有步骤。
show_extraction(
    image, kernel,

    # Window parameters
    conv_stride=1,
    pool_size=2,
    pool_stride=2,

    subplot_shape=(1, 4),
    figsize=(14, 6),
)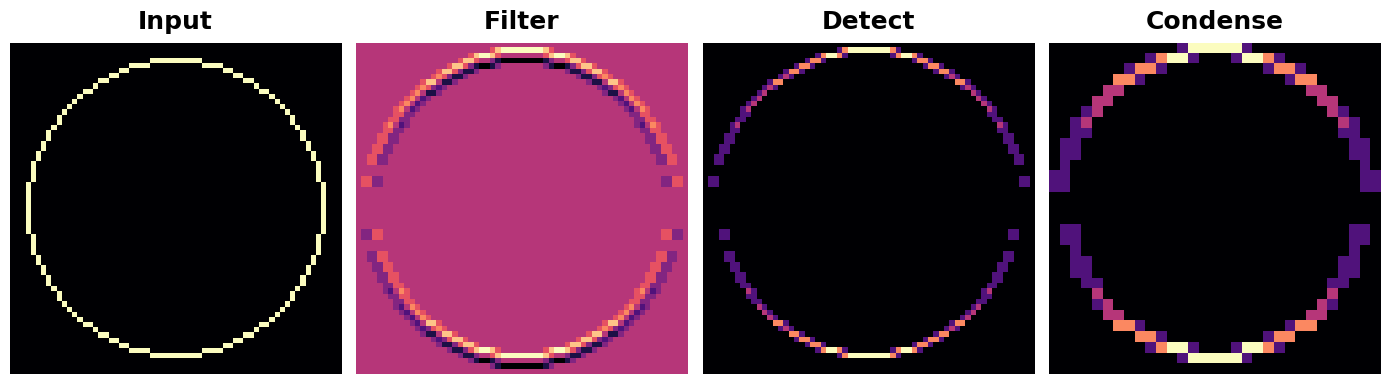
And that works pretty well! The kernel was designed to detect horizontal lines, and we can see that in the resulting feature map the more horizontal parts of the input end up with the greatest activation.
效果非常好!内核被设计用来检测水平线,我们可以看到,在生成的特征图中,输入中水平线较多的部分最终会获得最大的激活。
What would happen if we changed the strides of the convolution to 3?
如果我们将卷积的步长改为 3,会发生什么?
show_extraction(
    image, kernel,

    # Window parameters
    conv_stride=3,
    pool_size=2,
    pool_stride=2,

    subplot_shape=(1, 4),
    figsize=(14, 6),
)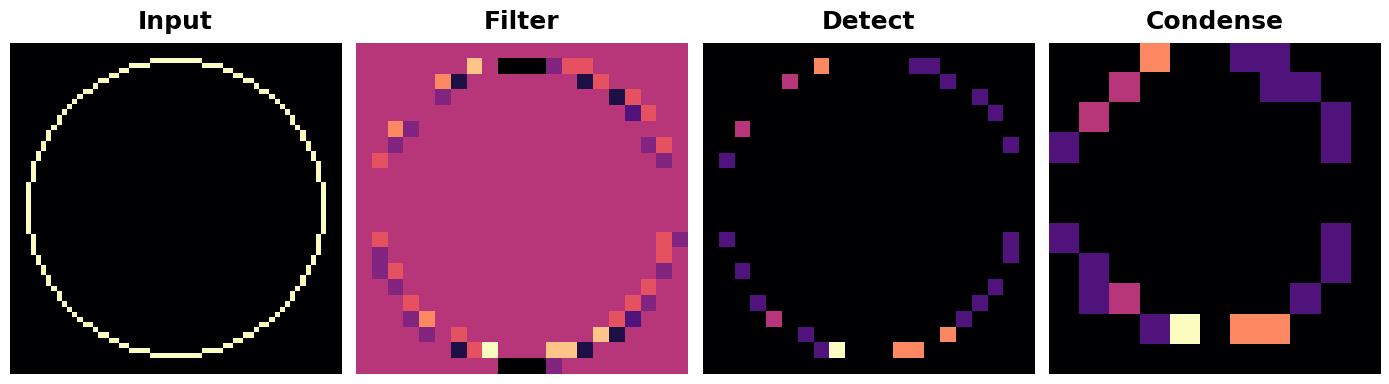
This seems to reduce the quality of the feature extracted. Our input circle is rather "finely detailed," being only 1 pixel wide. A convolution with strides of 3 is too coarse to produce a good feature map from it.
这似乎降低了提取的特征的质量。我们的输入圆相当“精细”,只有 1 个像素宽。步长为 3 的卷积太粗糙,无法从中生成良好的特征图。
Sometimes, a model will use a convolution with a larger stride in it's initial layer. This will usually be coupled with a larger kernel as well. The ResNet50 model, for instance, uses $7 \times 7$ kernels with strides of 2 in its first layer. This seems to accelerate the production of large-scale features without the sacrifice of too much information from the input.
有时,模型会在其初始层中使用步长较大的卷积。这通常也会与更大的内核相结合。例如,ResNet50 模型在其第一层使用步长为 2 的 $7 \times 7$ 个内核。这似乎可以加速大规模特征的生成,而不会牺牲太多输入信息。
Conclusion
结论
In this lesson, we looked at a characteristic computation common to both convolution and pooling: the sliding window and the parameters affecting its behavior in these layers. This style of windowed computation contributes much of what is characteristic of convolutional networks and is an essential part of their functioning.
在本课中,我们研究了卷积和池化共有的特征计算:滑动窗口 以及影响其在这些层中行为的参数。这种窗口计算风格贡献了卷积网络的大部分特征,是其功能的重要组成部分。
Your Turn
轮到你了
Move on to the Exercise where you'll explore sliding windows, learn about how stacking convolutional layers can increase the effective window size, and also learn about how convolution can be used with one-dimensional data, like time series.
继续进行 练习,你将在其中探索滑动窗口,了解如何 堆叠 卷积层可以增加有效窗口大小,以及如何将卷积用于一维数据,例如时间序列。