This notebook is an exercise in the Computer Vision course. You can reference the tutorial at this link.
Introduction
简介
In these exercises, you'll explore the operations a couple of popular convnet architectures use for feature extraction, learn about how convnets can capture large-scale visual features through stacking layers, and finally see how convolution can be used on one-dimensional data, in this case, a time series.
在这些练习中,您将探索几个流行的卷积网络架构用于特征提取的操作,了解卷积网络如何通过堆叠层捕获大规模视觉特征,最后了解如何在一维数据(在本例中为时间序列)上使用卷积。
Run the cell below to set everything up.
运行下面的单元格以设置所有内容。
# Setup feedback system
from learntools.core import binder
binder.bind(globals())
from learntools.computer_vision.ex4 import *

import tensorflow as tf
import matplotlib.pyplot as plt
import learntools.computer_vision.visiontools as visiontools

plt.rc('figure', autolayout=True)
plt.rc('axes', labelweight='bold', labelsize='large',
       titleweight='bold', titlesize=18, titlepad=10)
plt.rc('image', cmap='magma')
2024-08-27 03:39:09.040479: E external/local_xla/xla/stream_executor/cuda/cuda_dnn.cc:9261] Unable to register cuDNN factory: Attempting to register factory for plugin cuDNN when one has already been registered
2024-08-27 03:39:09.040543: E external/local_xla/xla/stream_executor/cuda/cuda_fft.cc:607] Unable to register cuFFT factory: Attempting to register factory for plugin cuFFT when one has already been registered
2024-08-27 03:39:09.043011: E external/local_xla/xla/stream_executor/cuda/cuda_blas.cc:1515] Unable to register cuBLAS factory: Attempting to register factory for plugin cuBLAS when one has already been registered(Optional) Experimenting with Feature Extraction
(可选)尝试特征提取
This exercise is meant to give you an opportunity to explore the sliding window computations and how their parameters affect feature extraction. There aren't any right or wrong answers -- it's just a chance to experiment!
此练习旨在让您有机会探索滑动窗口计算及其参数如何影响特征提取。没有正确或错误的答案——这只是一个实验的机会!
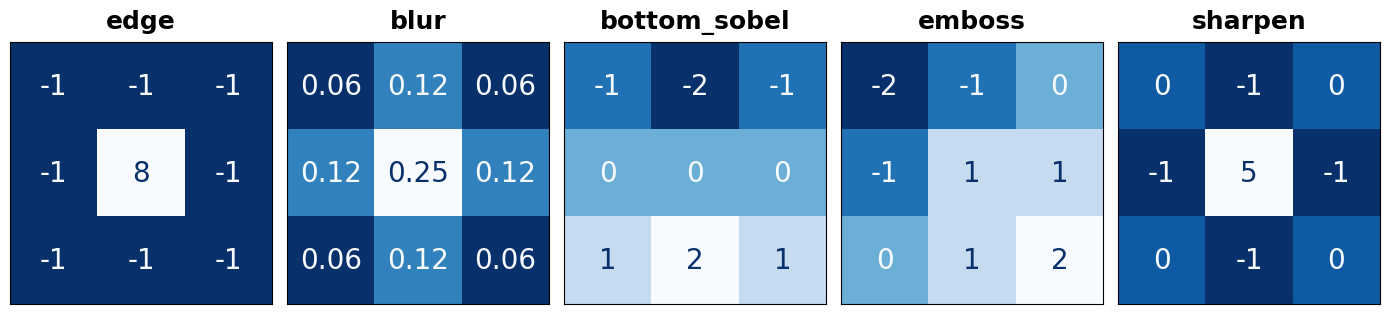
We've provided you with some images and kernels you can use. Run this cell to see them.
我们为您提供了一些可以使用的图像和内核。运行此单元以查看它们。
from learntools.computer_vision.visiontools import edge, blur, bottom_sobel, emboss, sharpen, circle

image_dir = '../input/computer-vision-resources/'
circle_64 = tf.expand_dims(circle([64, 64], val=1.0, r_shrink=4), axis=-1)
kaggle_k = visiontools.read_image(image_dir + str('k.jpg'), channels=1)
car = visiontools.read_image(image_dir + str('car_illus.jpg'), channels=1)
car = tf.image.resize(car, size=[200, 200])
images = [(circle_64, "circle_64"), (kaggle_k, "kaggle_k"), (car, "car")]

plt.figure(figsize=(14, 4))
for i, (img, title) in enumerate(images):
    plt.subplot(1, len(images), i+1)
    plt.imshow(tf.squeeze(img))
    plt.axis('off')
    plt.title(title)
plt.show();

kernels = [(edge, "edge"), (blur, "blur"), (bottom_sobel, "bottom_sobel"),
           (emboss, "emboss"), (sharpen, "sharpen")]
plt.figure(figsize=(14, 4))
for i, (krn, title) in enumerate(kernels):
    plt.subplot(1, len(kernels), i+1)
    visiontools.show_kernel(krn, digits=2, text_size=20)
    plt.title(title)
plt.show()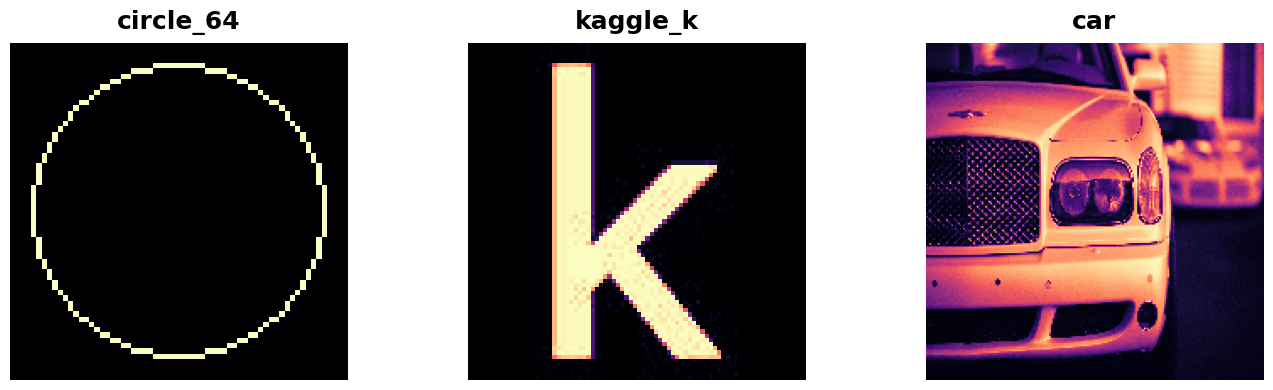
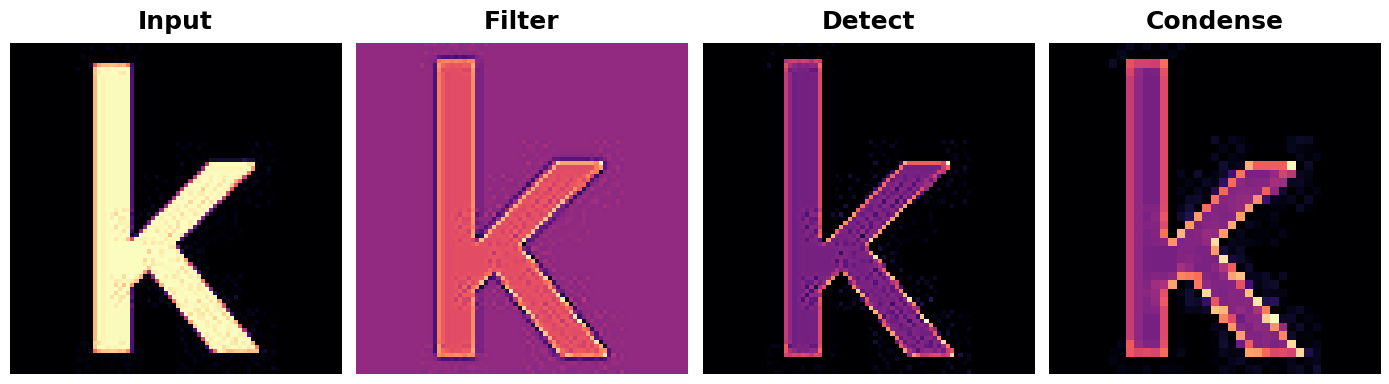
To choose one to experiment with, just enter it's name in the appropriate place below. Then, set the parameters for the window computation. Try out some different combinations and see what they do!
要选择一个进行实验,只需在下面的适当位置输入其名称即可。然后,设置窗口计算的参数。尝试一些不同的组合,看看它们有什么作用!
# YOUR CODE HERE: choose an image
# image = circle_64
image = kaggle_k

# YOUR CODE HERE: choose a kernel
# kernel = bottom_sobel
kernel = sharpen

visiontools.show_extraction(
    image, kernel,

    # YOUR CODE HERE: set parameters
    conv_stride=1,
    conv_padding='valid',
    pool_size=2,
    pool_stride=2,
    pool_padding='same',

    subplot_shape=(1, 4),
    figsize=(14, 6),
)
The Receptive Field
感受野
Trace back all the connections from some neuron and eventually you reach the input image. All of the input pixels a neuron is connected to is that neuron's receptive field. The receptive field just tells you which parts of the input image a neuron receives information from.
追溯某个神经元的所有连接,最终会到达输入图像。神经元所连接的所有输入像素都是该神经元的 感受野 。接受场只是告诉您神经元从输入图像的哪些部分接收信息。
As we've seen, if your first layer is a convolution with $3 \times 3$ kernels, then each neuron in that layer gets input from a $3 \times 3$ patch of pixels (except maybe at the border).
正如我们所见,如果您的第一层是具有 $3 \times 3$ 个内核的卷积,那么该层中的每个神经元都会从 $3 \times 3$ 个像素块(可能除了边界处)获得输入。
What happens if you add another convolutional layer with $3 \times 3$ kernels? Consider this next illustration:
如果您添加另一个具有 $3 \times 3$ 个内核的卷积层会发生什么?请考虑下图:
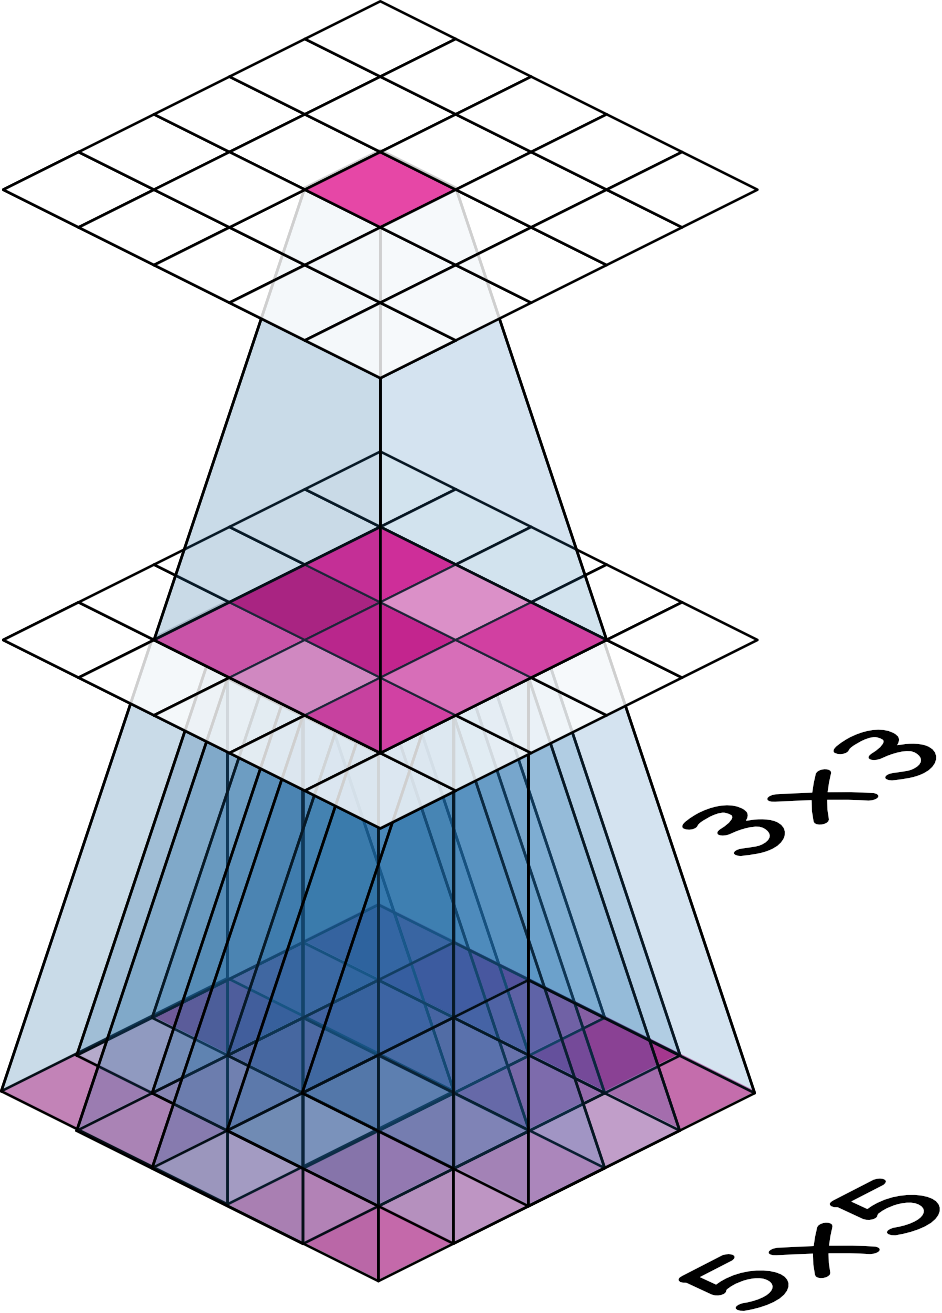
Now trace back the connections from the neuron at top and you can see that it's connected to a $5 \times 5$ patch of pixels in the input (the bottom layer): each neuron in the $3 \times 3$ patch in the middle layer is connected to a $3 \times 3$ input patch, but they overlap in a $5 \times 5$ patch. So that neuron at top has a $5 \times 5$ receptive field.
现在追溯顶部神经元的连接,你可以看到它连接到输入(底层)中一个 $5 \times 5$ 像素块:中间层中 $3 \times 3$ 块中的每个神经元都连接到一个 $3 \times 3$ 输入块,但它们在 $5 \times 5$ 块中重叠。因此,顶部的神经元具有一个 $5 \times 5$ 感受野。
1) Growing the Receptive Field
1) 增大感受野
Now, if you added a third convolutional layer with a (3, 3) kernel, what receptive field would its neurons have? Run the cell below for an answer. (Or see a hint first!)
现在,如果你添加一个带有 (3, 3) 核的 第三 卷积层,它的神经元会具有什么感受野?运行下面的单元来获取答案。(或者先看提示!)
# View the solution (Run this code cell to receive credit!)
q_1.check()
Correct:
The third layer would have a $7 \times 7$ receptive field.
第三层将有一个 $7 \times 7$ 的感受野。
# Lines below will give you a hint
#q_1.hint()
So why stack layers like this? Three (3, 3) kernels have 27 parameters, while one (7, 7) kernel has 49, though they both create the same receptive field. This stacking-layers trick is one of the ways convnets are able to create large receptive fields without increasing the number of parameters too much. You'll see how to do this yourself in the next lesson!
那么为什么要这样堆叠层呢?三个 (3, 3) 内核有 27 个参数,而一个 (7, 7) 内核有 49 个参数,尽管它们都创建了相同的接受场。这种堆叠层技巧是卷积网络能够在不增加太多参数数量的情况下创建大型接受场的方法之一。您将在下一课中看到如何自己做到这一点!
(Optional) One-Dimensional Convolution
(可选)一维卷积
Convolutional networks turn out to be useful not only (two-dimensional) images, but also on things like time-series (one-dimensional) and video (three-dimensional).
事实证明,卷积网络不仅对(二维)图像有用,而且对时间序列(一维)和视频(三维)等也有用。
We've seen how convolutional networks can learn to extract features from (two-dimensional) images. It turns out that convnets can also learn to extract features from things like time-series (one-dimensional) and video (three-dimensional).
我们已经了解了卷积网络如何学习从(二维)图像中提取特征。事实证明,卷积网络还可以学习从时间序列(一维)和视频(三维)等中提取特征。
In this (optional) exercise, we'll see what convolution looks like on a time-series.
在此(可选)练习中,我们将了解卷积在时间序列上的表现。
The time series we'll use is from Google Trends. It measures the popularity of the search term "machine learning" for weeks from January 25, 2015 to January 15, 2020.
我们将使用的时间序列来自 Google Trends。它衡量了从 2015 年 1 月 25 日到 2020 年 1 月 15 日的几周内搜索词“机器学习”的流行度。
import pandas as pd

# Load the time series as a Pandas dataframe
machinelearning = pd.read_csv(
    '../input/computer-vision-resources/machinelearning.csv',
    parse_dates=['Week'],
    index_col='Week',
)

machinelearning.plot();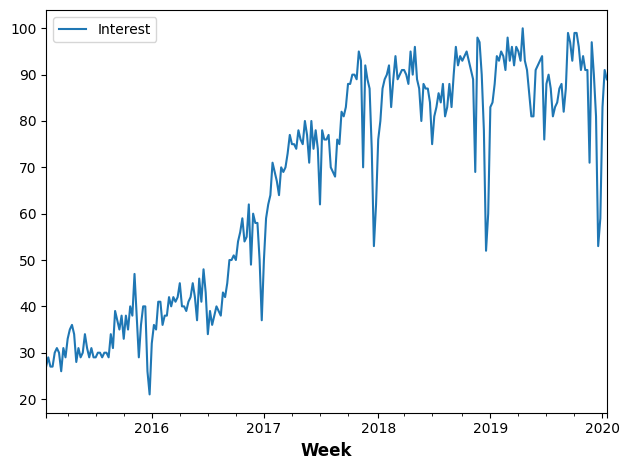
What about the kernels? Images are two-dimensional and so our kernels were 2D arrays. A time-series is one-dimensional, so what should the kernel be? A 1D array! Here are some kernels sometimes used on time-series data:
那么核函数呢?图像是二维的,所以我们的核函数是二维数组。时间序列是一维的,那么核函数应该是什么呢?一维数组!以下是一些有时用于时间序列数据的核函数:
detrend = tf.constant([-1, 1], dtype=tf.float32)

average = tf.constant([0.2, 0.2, 0.2, 0.2, 0.2], dtype=tf.float32)

spencer = tf.constant([-3, -6, -5, 3, 21, 46, 67, 74, 67, 46, 32, 3, -5, -6, -3], dtype=tf.float32) / 320
Convolution on a sequence works just like convolution on an image. The difference is just that a sliding window on a sequence only has one direction to travel -- left to right -- instead of the two directions on an image. And just like before, the features picked out depend on the pattern on numbers in the kernel.
序列上的卷积与图像上的卷积一样。不同之处在于,序列上的滑动窗口只有一个方向移动——从左到右——而不是图像上的两个方向。和之前一样,挑选出的特征取决于内核中的数字模式。
Can you guess what kind of features these kernels extract? Uncomment one of the kernels below and run the cell to see!
你能猜出这些内核提取了什么样的特征吗?取消注释下面的一个内核并运行单元格以查看!
# UNCOMMENT ONE
# kernel = detrend
# kernel = average
kernel = spencer

# Reformat for TensorFlow
ts_data = machinelearning.to_numpy()
ts_data = tf.expand_dims(ts_data, axis=0)
ts_data = tf.cast(ts_data, dtype=tf.float32)
kern = tf.reshape(kernel, shape=(*kernel.shape, 1, 1))

ts_filter = tf.nn.conv1d(
    input=ts_data,
    filters=kern,
    stride=1,
    padding='VALID',
)

# Format as Pandas Series
machinelearning_filtered = pd.Series(tf.squeeze(ts_filter).numpy())

machinelearning_filtered.plot();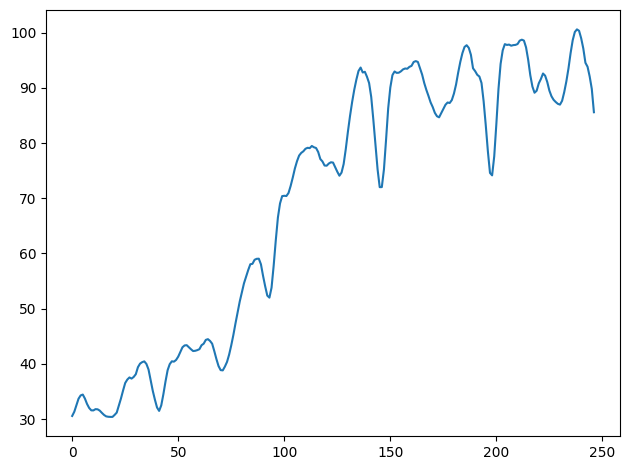
# UNCOMMENT ONE
# kernel = detrend
# kernel = average
kernels = {'detrend':detrend, 'average':average, 'spencer':spencer}

for kernel in kernels:
    # Reformat for TensorFlow
    ts_data = machinelearning.to_numpy()
    ts_data = tf.expand_dims(ts_data, axis=0)
    ts_data = tf.cast(ts_data, dtype=tf.float32)
#     kern = tf.reshape(kernel, shape=(*kernel.shape, 1, 1))
    kern = tf.reshape(kernels[kernel], shape=(*kernels[kernel].shape, 1, 1))

    ts_filter = tf.nn.conv1d(
        input=ts_data,
        filters=kern,
        stride=1,
        padding='VALID',
    )

    # Format as Pandas Series
    machinelearning_filtered = pd.Series(tf.squeeze(ts_filter).numpy())

#     machinelearning_filtered.plot();
    plt.plot(machinelearning_filtered,label=kernel)

plt.legend()
plt.show()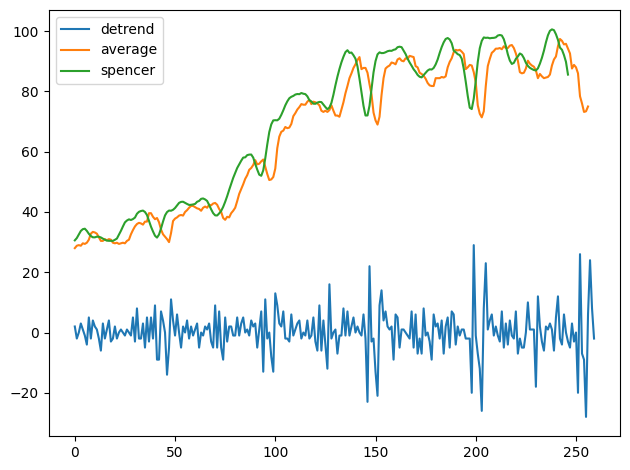
In fact, the detrend kernel filters for changes in the series, while average and spencer are both "smoothers" that filter for low-frequency components in the series.
事实上,detrend 内核过滤序列中的 变化,而 average 和 spencer 都是“平滑器”,过滤序列中的低频成分。
If you were interested in predicting the future popularity of search terms, you might train a convnet on time-series like this one. It would try to learn what features in those series are most informative for the prediction.
如果您有兴趣预测搜索词的未来流行度,您可以在像这样的时间序列上训练卷积网络。它会尝试了解这些序列中的哪些特征对预测最有帮助。
Though convnets are not often the best choice on their own for these kinds of problems, they are often incorporated into other models for their feature extraction capabilities.
虽然卷积网络本身通常不是解决这类问题的最佳选择,但它们通常会被纳入其他模型中,以发挥其特征提取功能。
Conclusion
结论
This lesson ends our discussion of feature extraction. Hopefully, having completed these lessons, you've gained some intuition about how the process works and why the usual choices for its implementation are often the best ones.
本课结束了我们对特征提取的讨论。希望在完成这些课程后,您已经对该过程的工作原理以及为什么其实施的通常选择往往是最好的选择有了一些直观的了解。
Keep Going
继续前进
In the next lesson, Lesson 5, you'll learn how to compose the Conv2D and MaxPool2D layers to build your own convolutional networks from scratch.
在下一课 第 5 课 中,您将学习如何组合 Conv2D 和 MaxPool2D 层,从头开始构建您自己的卷积网络。