This notebook is an exercise in the Computer Vision course. You can reference the tutorial at this link.
Introduction
介绍
In this exercise, you'll work on building some intuition around feature extraction. First, we'll walk through the example we did in the tutorial again, but this time, with a kernel you choose yourself. We've mostly been working with images in this course, but what's behind all of the operations we're learning about is mathematics. So, we'll also take a look at how these feature maps can be represented instead as arrays of numbers and what effect convolution with a kernel will have on them.
在本练习中,您将围绕特征提取建立一些直觉。首先,我们将再次介绍我们在教程中所做的示例,但这次,使用您自己选择的内核。我们在本课程中主要处理图像,但我们正在学习的所有操作背后都是数学。因此,我们还将研究如何将这些特征图表示为数字数组,以及使用内核进行卷积对它们有何影响。
Run the cell below to get started!
运行下面的单元格开始吧!
# Setup feedback system
from learntools.core import binder
binder.bind(globals())
from learntools.computer_vision.ex2 import *

import numpy as np
import tensorflow as tf
import matplotlib.pyplot as plt

plt.rc('figure', autolayout=True)
plt.rc('axes', labelweight='bold', labelsize='large',
       titleweight='bold', titlesize=18, titlepad=10)
plt.rc('image', cmap='magma')

tf.config.run_functions_eagerly(True)
2024-05-30 06:14:27.808915: E external/local_xla/xla/stream_executor/cuda/cuda_dnn.cc:9261] Unable to register cuDNN factory: Attempting to register factory for plugin cuDNN when one has already been registered
2024-05-30 06:14:27.809050: E external/local_xla/xla/stream_executor/cuda/cuda_fft.cc:607] Unable to register cuFFT factory: Attempting to register factory for plugin cuFFT when one has already been registered
2024-05-30 06:14:27.963423: E external/local_xla/xla/stream_executor/cuda/cuda_blas.cc:1515] Unable to register cuBLAS factory: Attempting to register factory for plugin cuBLAS when one has already been registeredApply Transformations
应用转换
The next few exercises walk through feature extraction just like the example in the tutorial. Run the following cell to load an image we'll use for the next few exercises.
接下来的几个练习将像教程中的示例一样介绍特征提取。运行以下单元格以加载我们将在接下来的几个练习中使用的图像。
image_path = '../input/computer-vision-resources/car_illus.jpg'
image = tf.io.read_file(image_path)
image = tf.io.decode_jpeg(image, channels=1)
image = tf.image.resize(image, size=[400, 400])

img = tf.squeeze(image).numpy()
plt.figure(figsize=(6, 6))
plt.imshow(img, cmap='gray')
plt.axis('off')
plt.show();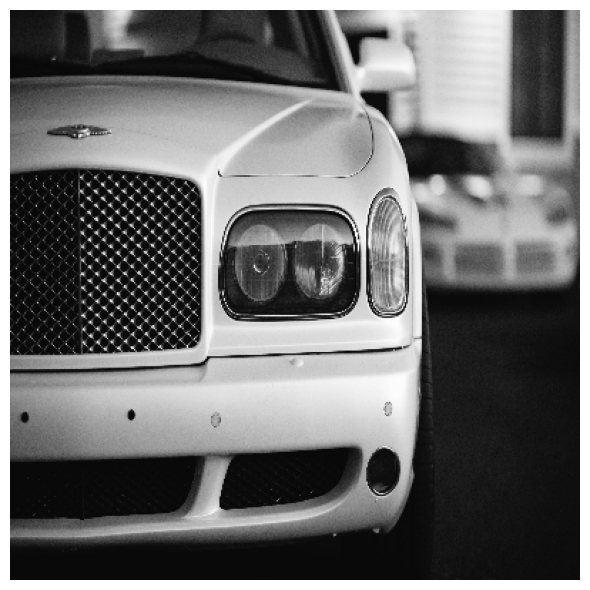
You can run this cell to see some standard kernels used in image processing.
您可以运行此单元格来查看图像处理中使用的一些标准内核。
import learntools.computer_vision.visiontools as visiontools
from learntools.computer_vision.visiontools import edge, bottom_sobel, emboss, sharpen

kernels = [edge, bottom_sobel, emboss, sharpen]
names = ["Edge Detect", "Bottom Sobel", "Emboss", "Sharpen"]

plt.figure(figsize=(12, 12))
for i, (kernel, name) in enumerate(zip(kernels, names)):
    plt.subplot(1, 4, i+1)
    visiontools.show_kernel(kernel)
    plt.title(name)
plt.tight_layout()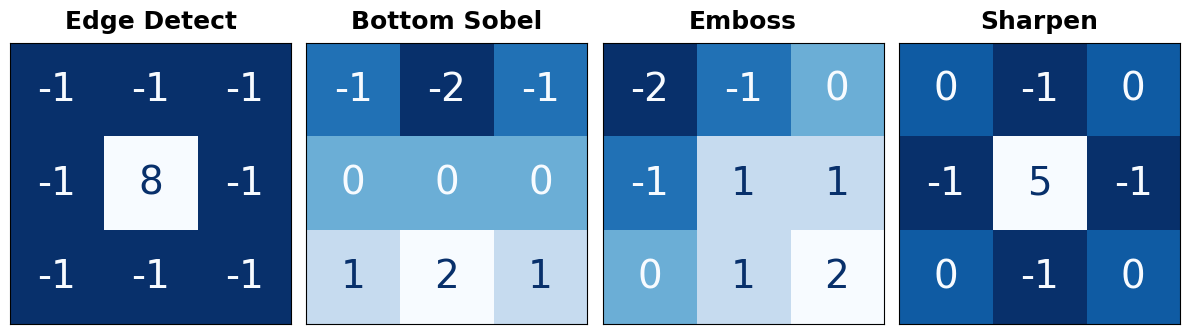
1) Define Kernel
1) 定义内核
Use the next code cell to define a kernel. You have your choice of what kind of kernel to apply. One thing to keep in mind is that the sum of the numbers in the kernel determines how bright the final image is. Generally, you should try to keep the sum of the numbers between 0 and 1 (though that's not required for a correct answer).
使用下一个代码单元定义内核。您可以选择应用哪种内核。需要记住的一件事是,内核中数字的总和决定了最终图像的亮度。通常,您应该尝试将数字的总和保持在 0 到 1 之间(尽管这不是正确答案的必要条件)。
In general, a kernel can have any number of rows and columns. For this exercise, let's use a $3 \times 3$ kernel, which often gives the best results. Define a kernel with tf.constant.
通常,内核可以有任意数量的行和列。对于本练习,我们使用 $3 \times 3$ 内核,这通常会产生最佳结果。使用 tf.constant 定义内核。
# YOUR CODE HERE: Define a kernel with 3 rows and 3 columns.
kernel = tf.constant([
    [-1, -1, -1],
    [-1,  8, -1],
    [-1, -1, -1]
    #____,
])
# Uncomment to view kernel
# visiontools.show_kernel(kernel)

# Check your answer
q_1.check()
Correct
# Lines below will give you a hint or solution code
#q_1.hint()
q_1.solution()
Solution:
# This is just one possibility.
kernel = tf.constant([
    [-2, -1, 0],
    [-1, 1, 1],
    [0, 1, 2],
])
Now we'll do the first step of feature extraction, the filtering step. First run this cell to do some reformatting for TensorFlow.
现在我们将进行特征提取的第一步,即过滤步骤。首先运行此单元对 TensorFlow 进行一些重新格式化。
# Reformat for batch compatibility.
image = tf.image.convert_image_dtype(image, dtype=tf.float32)
image = tf.expand_dims(image, axis=0)
kernel = tf.reshape(kernel, [*kernel.shape, 1, 1])
kernel = tf.cast(kernel, dtype=tf.float32)
2) Apply Convolution
2) 应用卷积
Now we'll apply the kernel to the image by a convolution. The layer in Keras that does this is layers.Conv2D. What is the backend function in TensorFlow that performs the same operation?
现在我们将通过卷积将内核应用于图像。Keras 中执行此操作的 层 是 layers.Conv2D。TensorFlow 中执行相同操作的 后端函数 是什么?
# YOUR CODE HERE: Give the TensorFlow convolution function (without arguments)
# conv_fn = ____
conv_fn = tf.nn.conv2d

# Check your answer
q_2.check()
Correct
# Lines below will give you a hint or solution code
#q_2.hint()
q_2.solution()
Solution:
conv_fn = tf.nn.conv2d
Once you've got the correct answer, run this next cell to execute the convolution and see the result!
一旦得到了正确的答案,运行下一个单元来执行卷积并查看结果!
image_filter = conv_fn(
    input=image,
    filters=kernel,
    strides=1, # or (1, 1)
    padding='SAME',
)

plt.imshow(
    # Reformat for plotting
    tf.squeeze(image_filter)
)
plt.axis('off')
plt.show();
Can you see how the kernel you chose relates to the feature map it produced?
您能看到您选择的内核与其生成的特征图之间的关系吗?
3) Apply ReLU
3) 应用 ReLU
Now detect the feature with the ReLU function. In Keras, you'll usually use this as the activation function in a Conv2D layer. What is the backend function in TensorFlow that does the same thing?
现在使用 ReLU 函数检测特征。在 Keras 中,您通常会将其用作 Conv2D 层中的激活函数。TensorFlow 中执行相同操作的 后端函数 是什么?
# YOUR CODE HERE: Give the TensorFlow ReLU function (without arguments)
# relu_fn = ____
relu_fn = tf.nn.relu

# Check your answer
q_3.check()
Correct
# Lines below will give you a hint or solution code
#q_3.hint()
q_3.solution()
Solution:
relu_fn = tf.nn.reluOnce you've got the solution, run this cell to detect the feature with ReLU and see the result!
得到解决方案后,运行此单元以使用 ReLU 检测特征并查看结果!
The image you see below is the feature map produced by the kernel you chose. If you like, experiment with some of the other suggested kernels above, or, try to invent one that will extract a certain kind of feature.
您在下面看到的图像是由您选择的内核生成的特征图。如果您愿意,可以尝试使用上面建议的其他一些内核,或者尝试发明一个可以提取特定类型特征的内核。
image_detect = relu_fn(image_filter)

plt.imshow(
    # Reformat for plotting
    tf.squeeze(image_detect)
)
plt.axis('off')
plt.show();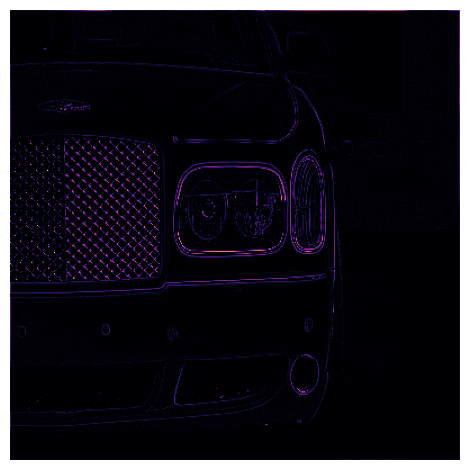
In the tutorial, our discussion of kernels and feature maps was mainly visual. We saw the effect of Conv2D and ReLU by observing how they transformed some example images.
在本教程中,我们对内核和特征图的讨论主要是视觉上的。我们通过观察它们如何转换一些示例图像来了解Conv2D和ReLU的效果。
But the operations in a convolutional network (like in all neural networks) are usually defined through mathematical functions, through a computation on numbers. In the next exercise, we'll take a moment to explore this point of view.
但卷积网络中的操作(就像所有神经网络一样)通常是通过数学函数、通过数字计算来定义的。在下一个练习中,我们将花点时间探索这个观点。
Let's start by defining a simple array to act as an image, and another array to act as the kernel. Run the following cell to see these arrays.
让我们首先定义一个简单的数组作为图像,另一个数组作为内核。运行以下单元格以查看这些数组。
# Sympy is a python library for symbolic mathematics. It has a nice
# pretty printer for matrices, which is all we'll use it for.
import sympy
sympy.init_printing()
from IPython.display import display

image = np.array([
    [0, 1, 0, 0, 0, 0],
    [0, 1, 0, 0, 0, 0],
    [0, 1, 0, 0, 0, 0],
    [0, 1, 0, 0, 0, 0],
    [0, 1, 0, 1, 1, 1],
    [0, 1, 0, 0, 0, 0],
])

kernel = np.array([
    [1, -1],
    [1, -1],
])

display(sympy.Matrix(image))
display(sympy.Matrix(kernel))
# Reformat for Tensorflow
image = tf.cast(image, dtype=tf.float32)
image = tf.reshape(image, [1, *image.shape, 1])
kernel = tf.reshape(kernel, [*kernel.shape, 1, 1])
kernel = tf.cast(kernel, dtype=tf.float32)
$\displaystyle \left[\begin{matrix}0 & 1 & 0 & 0 & 0 & 0\0 & 1 & 0 & 0 & 0 & 0\0 & 1 & 0 & 0 & 0 & 0\0 & 1 & 0 & 0 & 0 & 0\0 & 1 & 0 & 1 & 1 & 1\0 & 1 & 0 & 0 & 0 & 0\end{matrix}\right]$
$\displaystyle \left[\begin{matrix}1 & -1\1 & -1\end{matrix}\right]$
4) Observe Convolution on a Numerical Matrix
4) 观察数值矩阵上的卷积
What do you see? The image is simply a long vertical line on the left and a short horizontal line on the lower right. What about the kernel? What effect do you think it will have on this image? After you've thought about it, run the next cell for the answer.
你看到了什么?图像只是左侧的一条长垂直线和右下角的一条短水平线。内核呢?你认为它会对这幅图像产生什么影响?考虑完之后,运行下一个单元来寻找答案。
# View the solution (Run this code cell to receive credit!)
q_4.check()
Correct:
In the tutorial, we talked about how the pattern of positive numbers will tell you the kind of features the kernel will extract. This kernel has a vertical column of 1's, and so we would expect it to return features of vertical lines.
在教程中,我们讨论了正数模式如何告诉您内核将提取的特征类型。此内核有一个垂直列,由 1 组成,因此我们期望它返回垂直线的特征。
Now let's try it out. Run the next cell to apply convolution and ReLU to the image and display the result.
现在让我们尝试一下。运行下一个单元,将卷积和 ReLU 应用于图像并显示结果。
image_filter = tf.nn.conv2d(
    input=image,
    filters=kernel,
    strides=1,
#     padding='VALID',
    padding='SAME',
)
image_detect = tf.nn.relu(image_filter)

# The first matrix is the image after convolution, and the second is
# the image after ReLU.
display(sympy.Matrix(tf.squeeze(image_filter).numpy()))
display(sympy.Matrix(tf.squeeze(image_detect).numpy()))
$\displaystyle \left[\begin{matrix}-2.0 & 2.0 & 0 & 0 & 0 & 0\-2.0 & 2.0 & 0 & 0 & 0 & 0\-2.0 & 2.0 & 0 & 0 & 0 & 0\-2.0 & 2.0 & -1.0 & 0 & 0 & 1.0\-2.0 & 2.0 & -1.0 & 0 & 0 & 1.0\-1.0 & 1.0 & 0 & 0 & 0 & 0\end{matrix}\right]$
$\displaystyle \left[\begin{matrix}0 & 2.0 & 0 & 0 & 0 & 0\0 & 2.0 & 0 & 0 & 0 & 0\0 & 2.0 & 0 & 0 & 0 & 0\0 & 2.0 & 0 & 0 & 0 & 1.0\0 & 2.0 & 0 & 0 & 0 & 1.0\0 & 1.0 & 0 & 0 & 0 & 0\end{matrix}\right]$
Is the result what you expected?
结果是否符合你的预期?
Conclusion
结论
In this lesson, you learned about the first two operations a convolutional classifier uses for feature extraction: filtering an image with a convolution and detecting the feature with the rectified linear unit.
在本课中,你了解了卷积分类器用于特征提取的前两个操作:使用 卷积 过滤 图像,使用 整流线性单元 检测 特征。
Keep Going
继续学习
Move on to Lesson 3 to learn the final operation: condensing the feature map with maximum pooling!
继续学习 第 3 课,学习最后一个操作:使用 最大池化 压缩 特征图!