Introduction
简介
Now that you've learned the fundamentals of convolutional classifiers, you're ready to move on to more advanced topics.
现在您已经了解了卷积分类器的基础知识,可以继续学习更高级的主题了。
In this lesson, you'll learn a trick that can give a boost to your image classifiers: it's called data augmentation.
在本课中,您将学习一种可以增强图像分类器的技巧:它被称为数据增强。
The Usefulness of Fake Data
虚假数据的用处
The best way to improve the performance of a machine learning model is to train it on more data. The more examples the model has to learn from, the better it will be able to recognize which differences in images matter and which do not. More data helps the model to generalize better.
提高机器学习模型性能的最佳方法是用更多数据进行训练。模型需要学习的示例越多,它就越能识别图像中的哪些差异重要,哪些不重要。更多数据有助于模型更好地泛化。
One easy way of getting more data is to use the data you already have. If we can transform the images in our dataset in ways that preserve the class, we can teach our classifier to ignore those kinds of transformations. For instance, whether a car is facing left or right in a photo doesn't change the fact that it is a Car and not a Truck. So, if we augment our training data with flipped images, our classifier will learn that "left or right" is a difference it should ignore.
获取更多数据的一种简单方法是使用您已有的数据。如果我们可以以保留类别的方式转换数据集中的图像,我们就可以教我们的分类器忽略这些类型的转换。例如,汽车在照片中是朝左还是朝右,都不会改变它是 汽车 而不是 卡车 的事实。因此,如果我们用翻转图像 增强 我们的训练数据,我们的分类器将了解到“左或右”是它应该忽略的差异。
And that's the whole idea behind data augmentation: add in some extra fake data that looks reasonably like the real data and your classifier will improve.
这就是数据增强背后的整个想法:添加一些看起来相当像真实数据的额外虚假数据,您的分类器就会得到改进。
Using Data Augmentation
使用数据增强
Typically, many kinds of transformation are used when augmenting a dataset. These might include rotating the image, adjusting the color or contrast, warping the image, or many other things, usually applied in combination. Here is a sample of the different ways a single image might be transformed.
通常,在增强数据集时会使用多种类型的转换。这些转换可能包括旋转图像、调整颜色或对比度、扭曲图像或许多其他操作,通常以组合方式应用。以下是单个图像可能被转换的不同方式的示例。
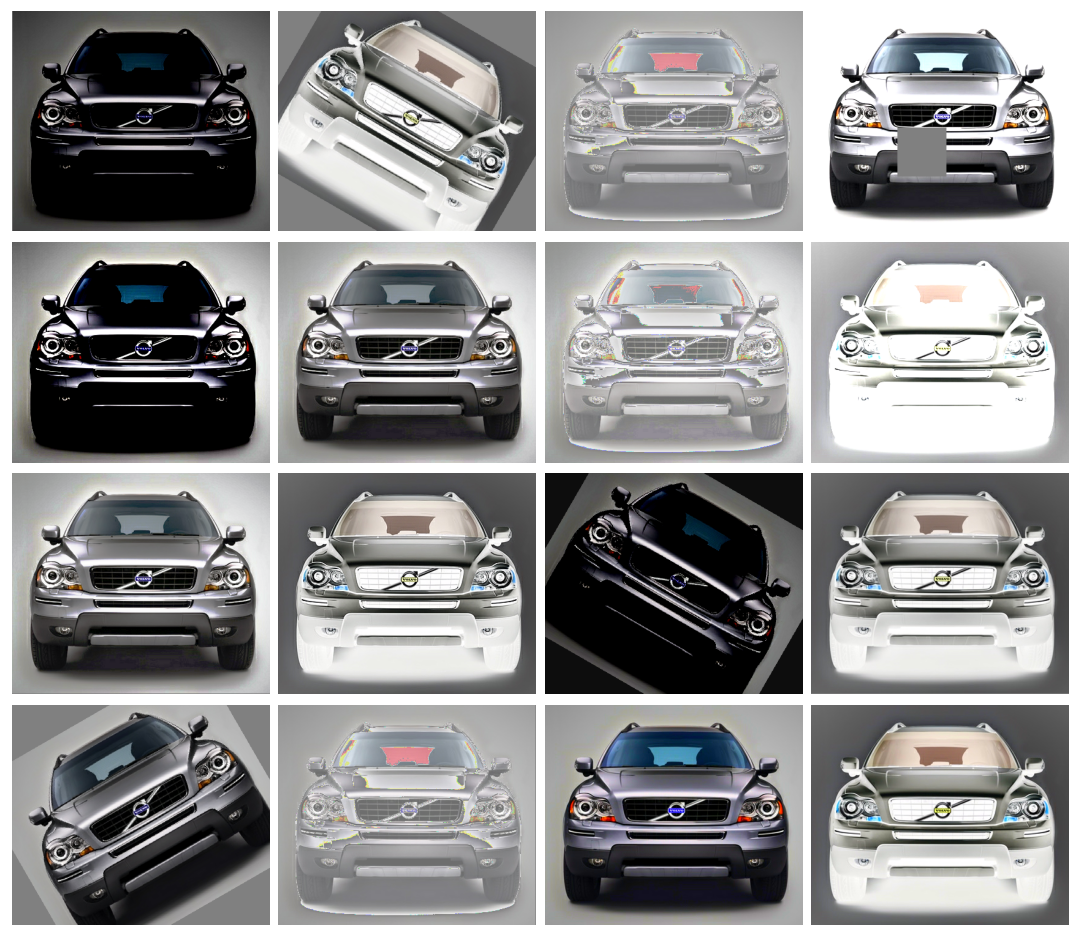
Data augmentation is usually done online, meaning, as the images are being fed into the network for training. Recall that training is usually done on mini-batches of data. This is what a batch of 16 images might look like when data augmentation is used.
数据增强通常是 在线 进行的,也就是说,当图像被输入到网络中进行训练时。回想一下,训练通常是在小批量数据上进行的。当使用数据增强时,一批 16 张图片可能就是这样的。
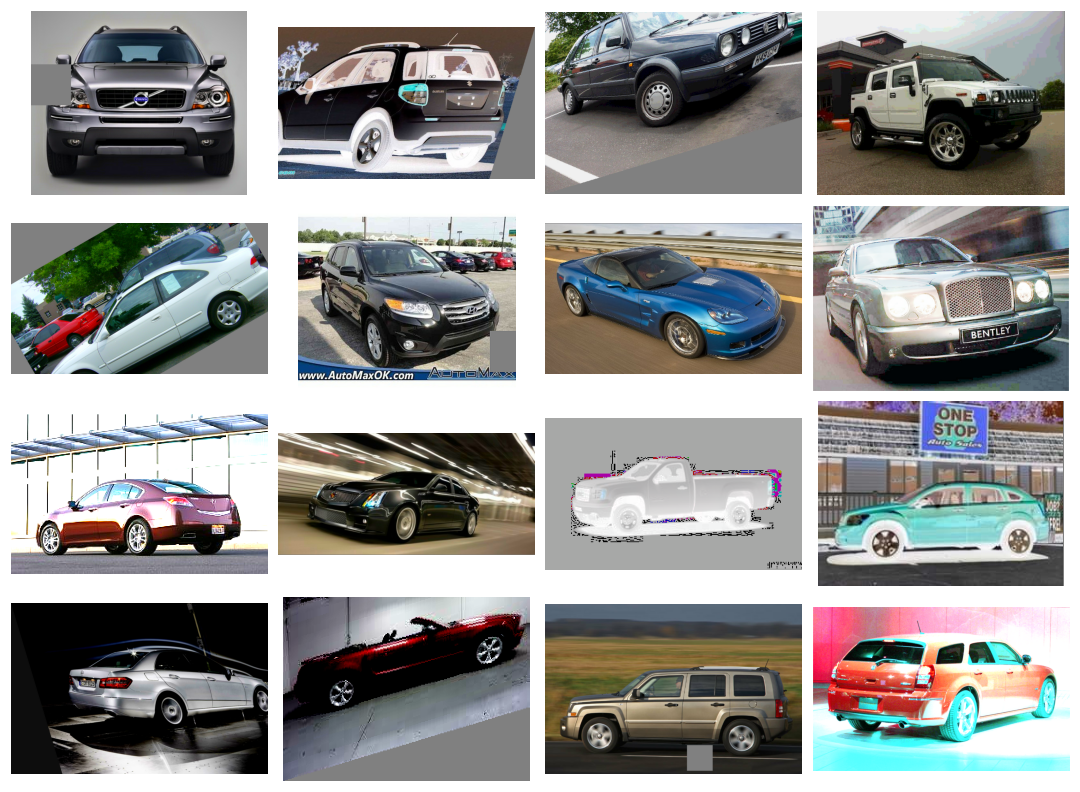
Each time an image is used during training, a new random transformation is applied. This way, the model is always seeing something a little different than what it's seen before. This extra variance in the training data is what helps the model on new data.
每次在训练过程中使用图像时,都会应用新的随机变换。这样,模型看到的总是与之前看到的略有不同。训练数据中的这种额外差异有助于模型处理新数据。
It's important to remember though that not every transformation will be useful on a given problem. Most importantly, whatever transformations you use should not mix up the classes. If you were training a digit recognizer, for instance, rotating images would mix up '9's and '6's. In the end, the best approach for finding good augmentations is the same as with most ML problems: try it and see!
但需要记住的是,并非每种变换都会对给定问题有用。最重要的是,无论使用哪种变换,都不应混淆类别。例如,如果您正在训练 数字识别器,旋转图像会混淆“9”和“6”。最后,找到良好增强的最佳方法与大多数 ML 问题相同:试试看!
Example - Training with Data Augmentation
示例 - 使用数据增强进行训练
Keras lets you augment your data in two ways. The first way is to include it in the data pipeline with a function like ImageDataGenerator. The second way is to include it in the model definition by using Keras's preprocessing layers. This is the approach that we'll take. The primary advantage for us is that the image transformations will be computed on the GPU instead of the CPU, potentially speeding up training.
Keras 允许您以两种方式增强数据。第一种方法是使用 ImageDataGenerator 之类的函数将其包含在数据管道中。第二种方法是使用 Keras 的 预处理层 将其包含在模型定义中。这是我们将采用的方法。对我们来说,主要优势是图像转换将在 GPU 而不是 CPU 上计算,从而有可能加快训练速度。
In this exercise, we'll learn how to improve the classifier from Lesson 1 through data augmentation. This next hidden cell sets up the data pipeline.
在本练习中,我们将学习如何通过数据增强改进第 1 课中的分类器。下一个隐藏单元设置数据管道。
# Imports
import os, warnings
import matplotlib.pyplot as plt
from matplotlib import gridspec

import numpy as np
import tensorflow as tf
from tensorflow.keras.preprocessing import image_dataset_from_directory

# Reproducability
def set_seed(seed=31415):
    np.random.seed(seed)
    tf.random.set_seed(seed)
    os.environ['PYTHONHASHSEED'] = str(seed)
    #os.environ['TF_DETERMINISTIC_OPS'] = '1'
set_seed()

# Set Matplotlib defaults
plt.rc('figure', autolayout=True)
plt.rc('axes', labelweight='bold', labelsize='large',
       titleweight='bold', titlesize=18, titlepad=10)
plt.rc('image', cmap='magma')
warnings.filterwarnings("ignore") # to clean up output cells

# Load training and validation sets
ds_train_ = image_dataset_from_directory(
    '../input/car-or-truck/train',
    labels='inferred',
    label_mode='binary',
    image_size=[128, 128],
    interpolation='nearest',
    batch_size=64,
    shuffle=True,
)
ds_valid_ = image_dataset_from_directory(
    '../input/car-or-truck/valid',
    labels='inferred',
    label_mode='binary',
    image_size=[128, 128],
    interpolation='nearest',
    batch_size=64,
    shuffle=False,
)

# Data Pipeline
def convert_to_float(image, label):
    image = tf.image.convert_image_dtype(image, dtype=tf.float32)
    return image, label

AUTOTUNE = tf.data.experimental.AUTOTUNE
ds_train = (
    ds_train_
    .map(convert_to_float)
    .cache()
    .prefetch(buffer_size=AUTOTUNE)
)
ds_valid = (
    ds_valid_
    .map(convert_to_float)
    .cache()
    .prefetch(buffer_size=AUTOTUNE)
)
2024-08-29 09:01:26.367070: E external/local_xla/xla/stream_executor/cuda/cuda_dnn.cc:9261] Unable to register cuDNN factory: Attempting to register factory for plugin cuDNN when one has already been registered
2024-08-29 09:01:26.367124: E external/local_xla/xla/stream_executor/cuda/cuda_fft.cc:607] Unable to register cuFFT factory: Attempting to register factory for plugin cuFFT when one has already been registered
2024-08-29 09:01:26.368567: E external/local_xla/xla/stream_executor/cuda/cuda_blas.cc:1515] Unable to register cuBLAS factory: Attempting to register factory for plugin cuBLAS when one has already been registered

Found 5117 files belonging to 2 classes.
Found 5051 files belonging to 2 classes.
Step 2 - Define Model
第 2 步 - 定义模型
To illustrate the effect of augmentation, we'll just add a couple of simple transformations to the model from Tutorial 1.
为了说明增强的效果,我们只需向教程 1 中的模型添加几个简单的转换。
from tensorflow import keras
from tensorflow.keras import layers
# these are a new feature in TF 2.2
from tensorflow.keras.layers.experimental import preprocessing

pretrained_base = tf.keras.models.load_model(
    '../input/cv-course-models/cv-course-models/vgg16-pretrained-base',
)
pretrained_base.trainable = False

model = keras.Sequential([
    # Preprocessing
    preprocessing.RandomFlip('horizontal'), # flip left-to-right
    preprocessing.RandomContrast(0.5), # contrast change by up to 50%
    # Base
    pretrained_base,
    # Head
    layers.Flatten(),
    layers.Dense(6, activation='relu'),
    layers.Dense(1, activation='sigmoid'),
])
Step 3 - Train and Evaluate
第 3 步 - 训练和评估
And now we'll start the training!
现在我们开始训练!
model.compile(
    optimizer='adam',
    loss='binary_crossentropy',
    metrics=['binary_accuracy'],
)

history = model.fit(
    ds_train,
    validation_data=ds_valid,
    epochs=30,
    verbose=0,
)
WARNING: All log messages before absl::InitializeLog() is called are written to STDERR
I0000 00:00:1724922101.900416 798 device_compiler.h:186] Compiled cluster using XLA! This line is logged at most once for the lifetime of the process.import pandas as pd
history_frame = pd.DataFrame(history.history)
history_frame.loc[:, ['loss', 'val_loss']].plot()
history_frame.loc[:, ['binary_accuracy', 'val_binary_accuracy']].plot();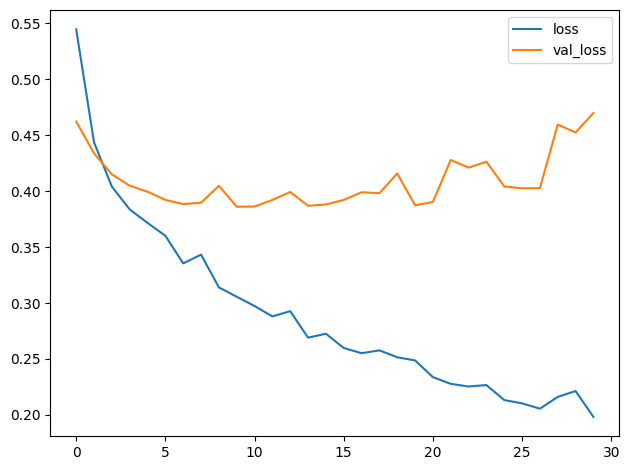
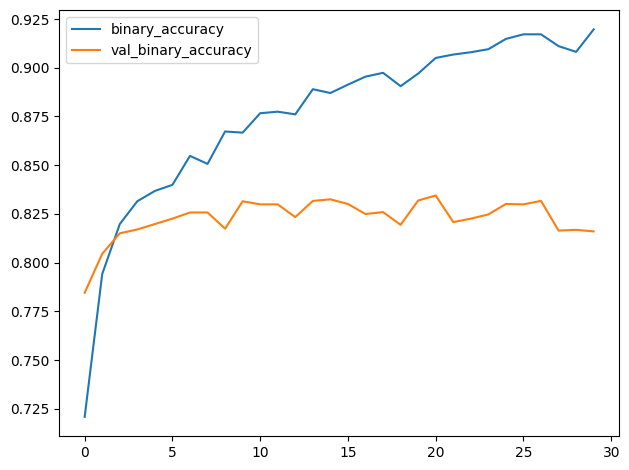
The training and validation curves in the model from Tutorial 1 diverged fairly quickly, suggesting that it could benefit from some regularization. The learning curves for this model were able to stay closer together, and we achieved some modest improvement in validation loss and accuracy. This suggests that the dataset did indeed benefit from the augmentation.
教程 1 中的模型的训练和验证曲线分歧相当快,表明它可以从某种正则化中受益。此模型的学习曲线能够保持更紧密的联系,并且我们在验证损失和准确性方面取得了一些适度的改进。这表明数据集确实从增强中受益。
Your Turn
轮到你了
Move on to the Exercise to apply data augmentation to the custom convnet you built in Lesson 5. This will be your best model ever!
继续进行 练习,将数据增强应用于您在第 5 课中构建的自定义卷积网络。这将是您有史以来最好的模型!